
Written by Dr. Dennis Hartlieb
Choosing the Right Composite Instruments for Restorative Dentistry
Choosing the right combination of composite instruments is critical for achieving successful restorative outcomes. This blog shares crucial aspects dentists should consider when selecting composite instruments, including material, shape, size, and more.
Are You Using the Right Composite Instruments?

1) Types of Composite Instruments
1. Composite Placement Instruments
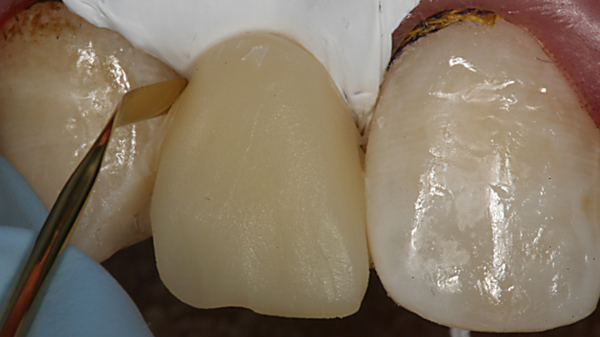
Designed with a flat, rounded or slightly curved paddle-like blade for precise placement and initial condensation of the composite material, these instruments will typically be non-flexible to allow the clinician to provide some pressure with the instrument.
This pressure will help insure adaptation of the composite to the tooth surface, and allow the composite to be molded into position.
This pressure will help insure adaptation of the composite to the tooth surface, and allow the composite to be molded into position.
Expert tip
The utilization of a gloved finger, cleaned with an alcohol gauze, can be useful in the initial placement of the composite for anterior bonded restorations, such as resin veneers or large Class IV composites.
With the composite rolled into a ball, a clean gloved finger (non-textured glove only) can be used to compress the composite over the facial surface of the tooth to expedite the initial placement of the composite.
With the composite rolled into a ball, a clean gloved finger (non-textured glove only) can be used to compress the composite over the facial surface of the tooth to expedite the initial placement of the composite.
2. Condensers
Condensers feature smooth, blunt, or rounded ends for compacting and adapting the composite into the cavity preparation, providing for a strong and void-free restoration.
Condensers are generally used for posterior composites, but can be useful for anterior direct composites, such as Class III and Class V composites.
Condensers are generally used for posterior composites, but can be useful for anterior direct composites, such as Class III and Class V composites.
3. Brushes
Artist brushes are useful for placing opaquers to aid in the block-out of tooth stains and discolorations, helping to create more esthetic appearing restorations.
Opaquers are also critical to help increase the opacity of the underlying composite, and with light brush strokes, blend the composite resin to tooth structure.
When placing tints, which add color and effects, such as hypocalcifications and translucency, artist brushes can be particularly helpful.
Opaquers are also critical to help increase the opacity of the underlying composite, and with light brush strokes, blend the composite resin to tooth structure.
When placing tints, which add color and effects, such as hypocalcifications and translucency, artist brushes can be particularly helpful.
Fine haired, synthetic brushes are most appropriate for dental composite placement and for smoothing surface composites.
Small, fine tip brushes are most commonly used when opaquing and tinting, while wide, broad brushes are more helpful with surface smoothing of the composite.
Small, fine tip brushes are most commonly used when opaquing and tinting, while wide, broad brushes are more helpful with surface smoothing of the composite.
Expert tip
A stiff, non-flexible instrument should be used for the initial placement and manipulation of the composite resin.
A wide, flat, surface-coated instrument that prevents ‘tug-back’ of the composite is useful for efficient composite placement for anterior composites, while a rounded ended surface-coated instrument is ideal for posterior composites.
When using artist brushes, it is best to ‘pre-wet’ your artist brush by saturating the brush with a resin-wetting agent, or the opaquer/tint that you will be using, then wiping off the excess resin with a dry gauze.
This ‘pre-wetting’ prevents ‘wicking up’ of the material (opaquer/tint) into the dry bristles and allows the operator to have optimal control of the material to be applied.
2) Common Types of Contouring and Shaping Composite Instruments
Kirstin Ramsay, DDS
DOT Premium Member, Survey Response
Expert tip
Keep your composite instruments clean; scratched instruments can lead to sticking and dragging of the composite material, affecting the restoration's quality.
During placement of the composite, the use of a lightly dampened alcohol gauze will keep the instrument blade clean and minimize pull-back of the composite.
During placement of the composite, the use of a lightly dampened alcohol gauze will keep the instrument blade clean and minimize pull-back of the composite.
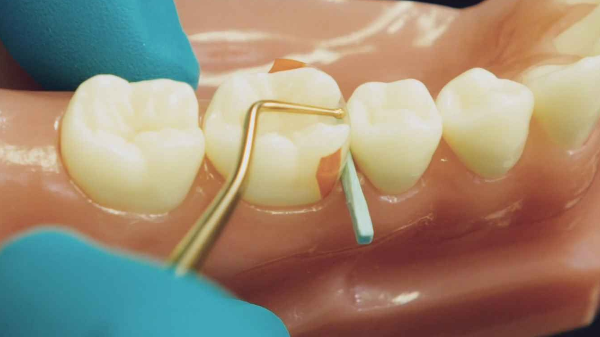
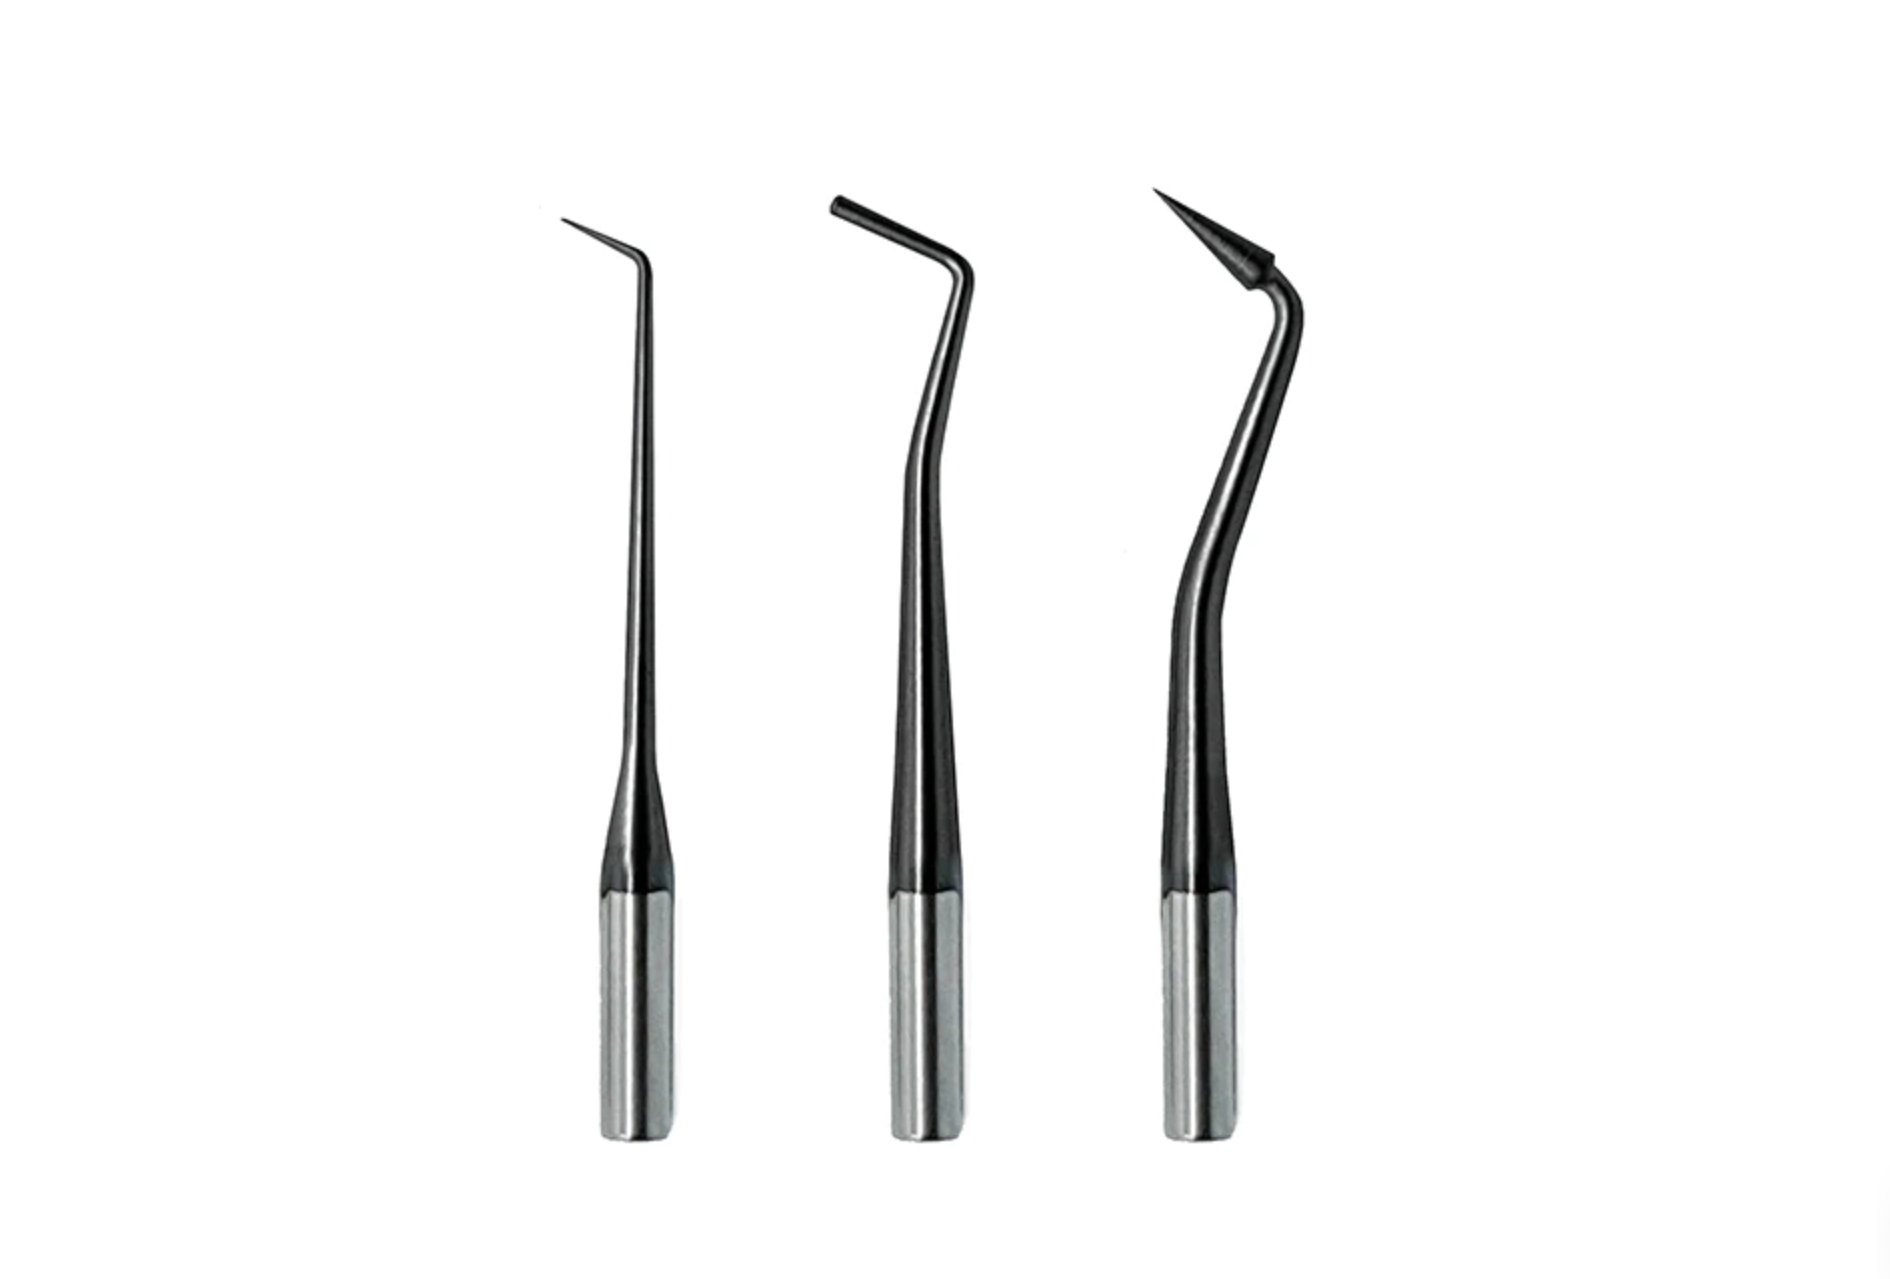
1. Composite Carvers
Featuring various shaped ends, composite carvers help in shaping the composite material during the contouring process.
Thin bladed instruments are critical to manipulate the composite material into the interproximal zones between the teeth and into the cervical crevice for teeth in the anterior esthetic zone. These instruments are also highly useful for opening incisal, facial and lingual embrasures.
Composite carvers with rounded or pointed tips can be used to create occlusal anatomy in posterior composites, or to assist in developing facial or lingual anatomy with anterior composites.
2. Burnishers
Composite resin cannot truly be burnished, but many manufacturers have shifted instruments available from the amalgam armamentarium, to use for composites.
These instruments can be used to smooth and shape the composite surface, blending layers of composite and eliminating unnatural contours to maximize the restoration's esthetics. The shape and size of burners will be dependent on the restoration position, size and shape.
These instruments can be used to smooth and shape the composite surface, blending layers of composite and eliminating unnatural contours to maximize the restoration's esthetics. The shape and size of burners will be dependent on the restoration position, size and shape.
3. Brushes
Wide-ended artist brushes, coupled with a modeling resin, can be used to contour and shape the composite restoration.
Fine-haired, synthetic bristle brushes are used in-between various layers of composite, or over the final layer of composite to create a smooth composite surface.
Fine-haired, synthetic bristle brushes are used in-between various layers of composite, or over the final layer of composite to create a smooth composite surface.
Expert tip
The correct size brush tip is critical for appropriate smoothing of the composite surface.
Too small of a brush will leave streaks in the composite, while too large of a brush may not allow the clinician to properly follow the contour of the tooth surface.
The clinician should avoid using HEMA based adhesives as a wetting agent for their brush; the HEMA may alter the color of the surface and effect the surface of the composite.
Specific brush wetting materials (Modeling Resin (Bisco), ResinBlend LV (Clinician’s Choice), Brush & Sculpt, (Cosmedent)), should be used conservatively to wet the brush prior to use on the composite surface.
3) Common Types of Finishing and Polishing Composite Instruments
Anthony Varchetto, DDS
DOT Premium Member, Survey Response
1. Burs
Composite finishing burs are useful to refine the contours and surface of the composite restoration.
Used with a high-speed hand-piece, these burs will be made of steel, tungsten carbide, or a diamond-impregnated surface, affording various surface qualities to the final composite.
Used with a high-speed hand-piece, these burs will be made of steel, tungsten carbide, or a diamond-impregnated surface, affording various surface qualities to the final composite.
Expert tip
Contouring with a carbide trimming bur (ET series, Brasseler) creates a smooth surface that leads to easy and efficient polishing, whereas diamond burs will leave a more roughened surface that may make it more difficult to create a final smooth surface.
Contouring the composite dry (without water) will help identify pits and defects in the composite restoration as the composite dust will settle into the defects, helping the operator to identify areas that need additional refinement, or in need of repair.
Contouring the composite dry (without water) will help identify pits and defects in the composite restoration as the composite dust will settle into the defects, helping the operator to identify areas that need additional refinement, or in need of repair.
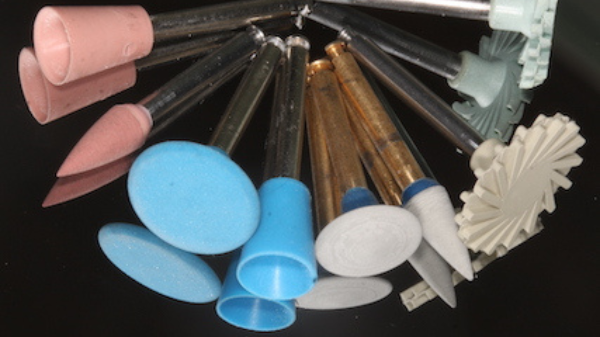
2. Rubber or Silicone
These polishers, made of rubber or silicone, will help with adding contour and are useful to achieve a high polish on the restoration. Various shapes, such as cups, points or wheels are available, and are selected based on the restoration size, shape and position.
Alta Mekaelian, DDS
DOT Premium Member, Survey Response
3. Discs
While composite discs can be used to help open occlusal embrasures in posterior Class II composite restorations, discs are most commonly used for the facial surfaces of anterior composite restorations.
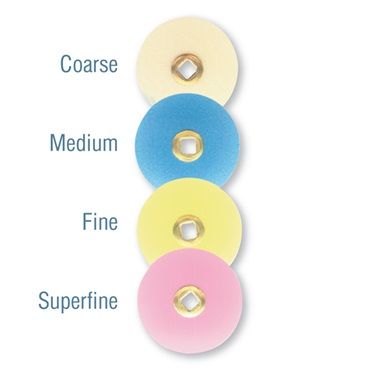
The discs are available in varying disc diameters and grit size. Coarse discs, or discs with large grit, can be used to remove excess composite, creating shape and contour, and are helpful for idealizing the inicisal edge length of the anterior composite restoration.
Discs with smaller, or finer grit, are used in sequential steps to help with contour, shaping and the final polishing of the composite resin. Discs are used with a slow speed handpiece, typically with rotational speeds between 5,000 to 15,000 rpm, depending on the amount of resin to be removed and the grit of the disc being used.

Expert tip
Discs are critical for ideal contouring and polishing of anterior composites. The discs should be used without water to identify pits and defects in the composite surface as the composite dust will settle into these ‘defect’ areas.
To prevent scratching of the composite surface during usage, the discs should be ‘flexed’ over the composite surface to allow as much of the disc surface to work over the composite surface. The discs are used sequentially from the most coarse to the finest grit, increasing pressure and speed as the grit size of the disc becomes more minute.
To prevent scratching of the composite surface during usage, the discs should be ‘flexed’ over the composite surface to allow as much of the disc surface to work over the composite surface. The discs are used sequentially from the most coarse to the finest grit, increasing pressure and speed as the grit size of the disc becomes more minute.
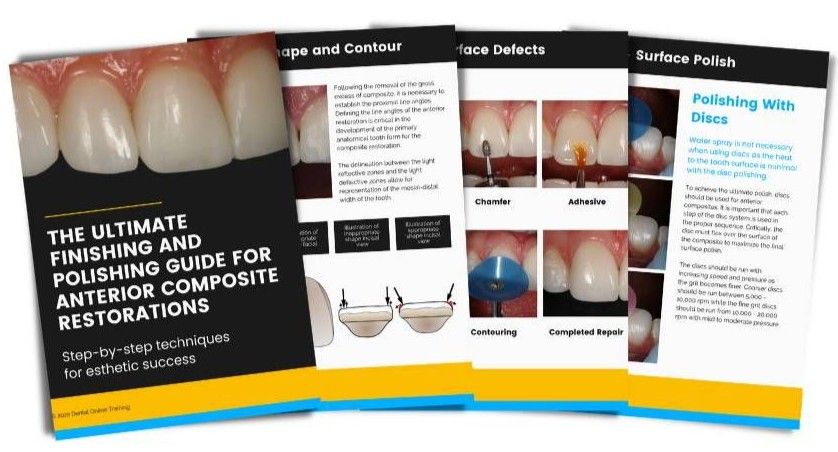
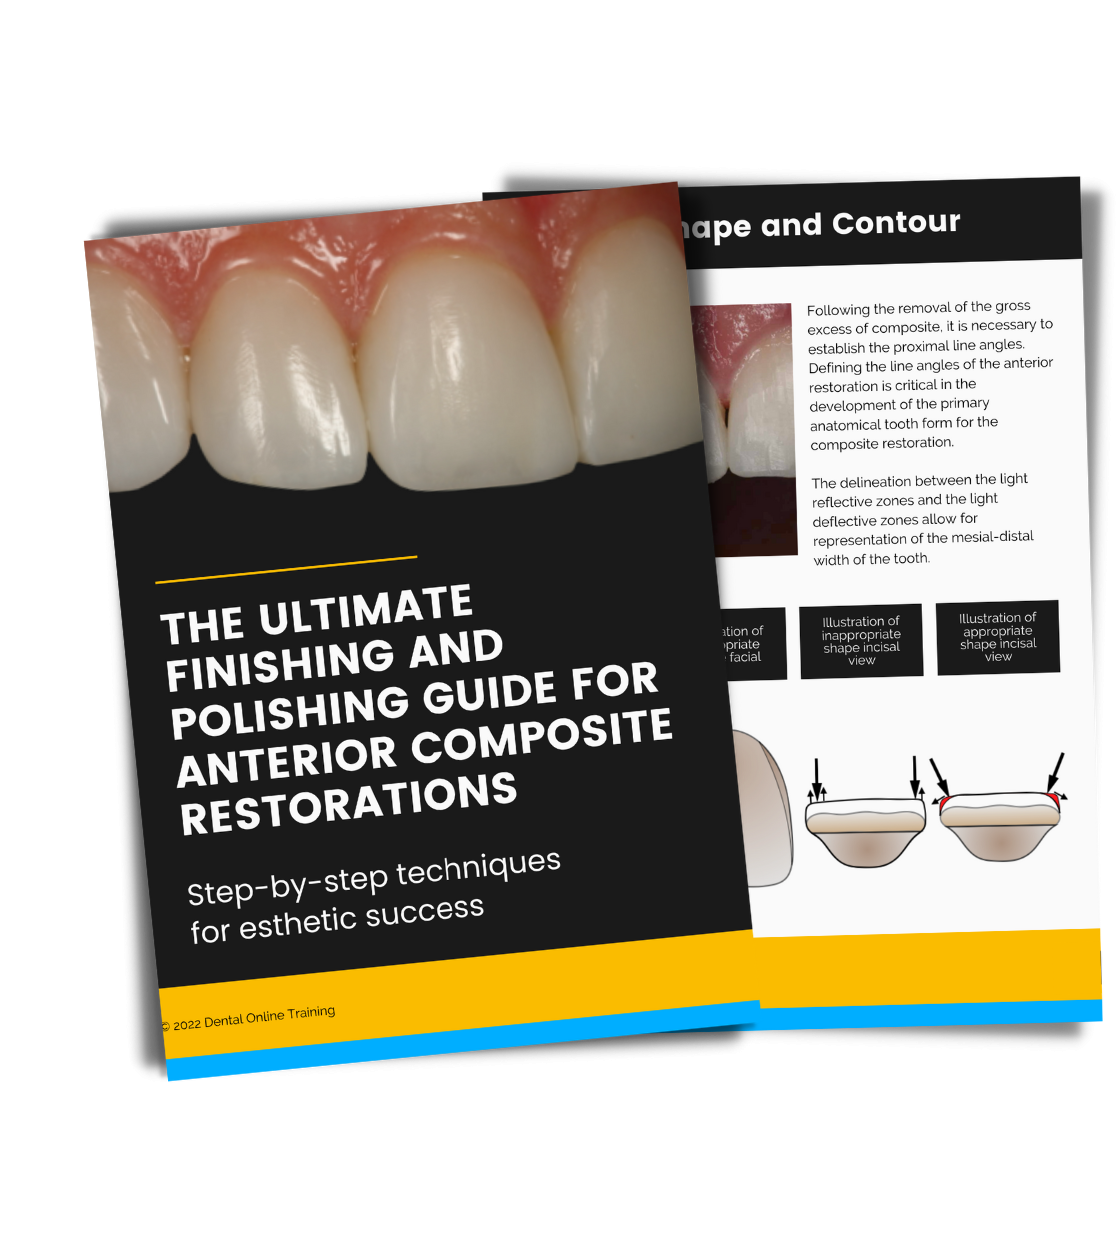
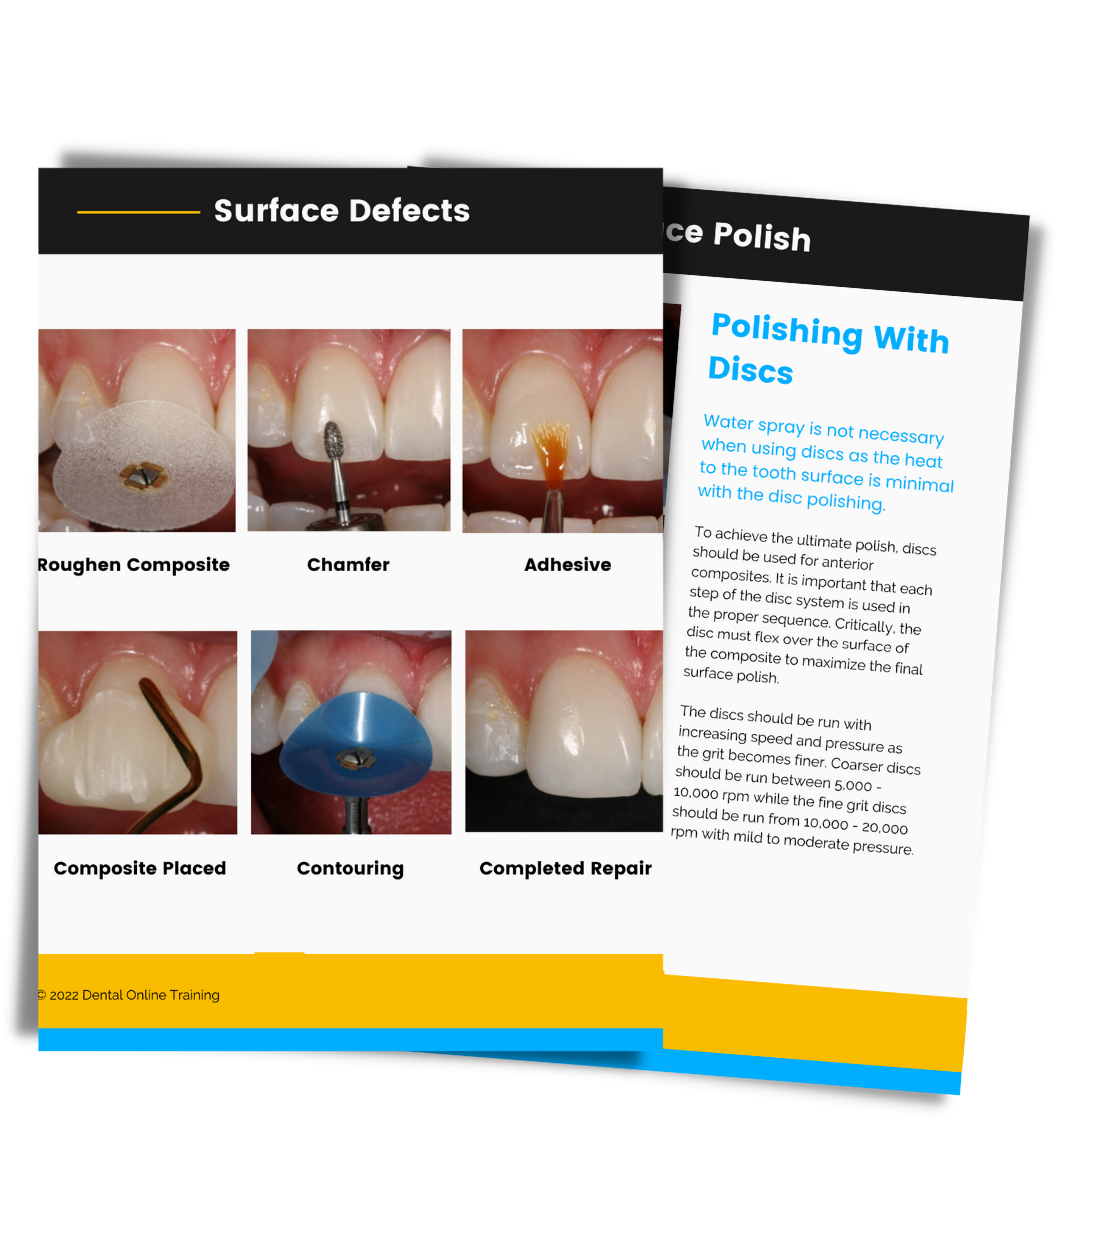
The Ultimate Finishing and Polishing Guide for Anterior Composite Restorations
4) Finding the Right Composite Instruments for You
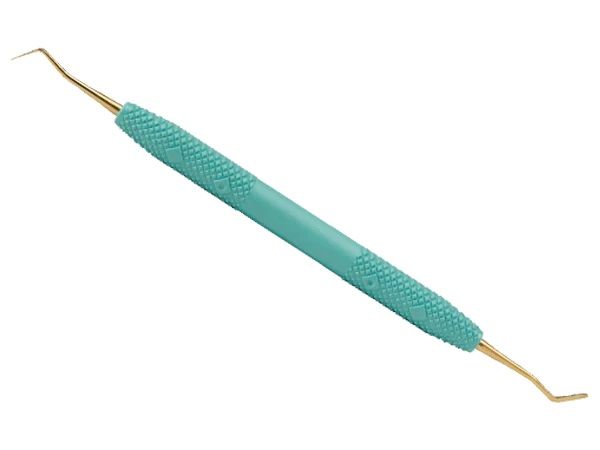
1. Stainless Steel Instruments
Expert tip
Do not panic if composite material happens to stick to your instrument.
Even if you are using an instrument that is not specially coated to reduce tug-back, wiping the instrument with a lightly dampened alcohol gauze will reduce tug-back of the composite material against the stainless steel instrument.
Even if you are using an instrument that is not specially coated to reduce tug-back, wiping the instrument with a lightly dampened alcohol gauze will reduce tug-back of the composite material against the stainless steel instrument.
Characteristics
Expert tip
These non-coated instruments are the least expensive of the dental instruments used for composite restorations. To maximize their potential, avoid scratches on the blade of the instrument which will cause the composite to more easily stick to the instrument.
2. Titanium Nitride Coated Instruments
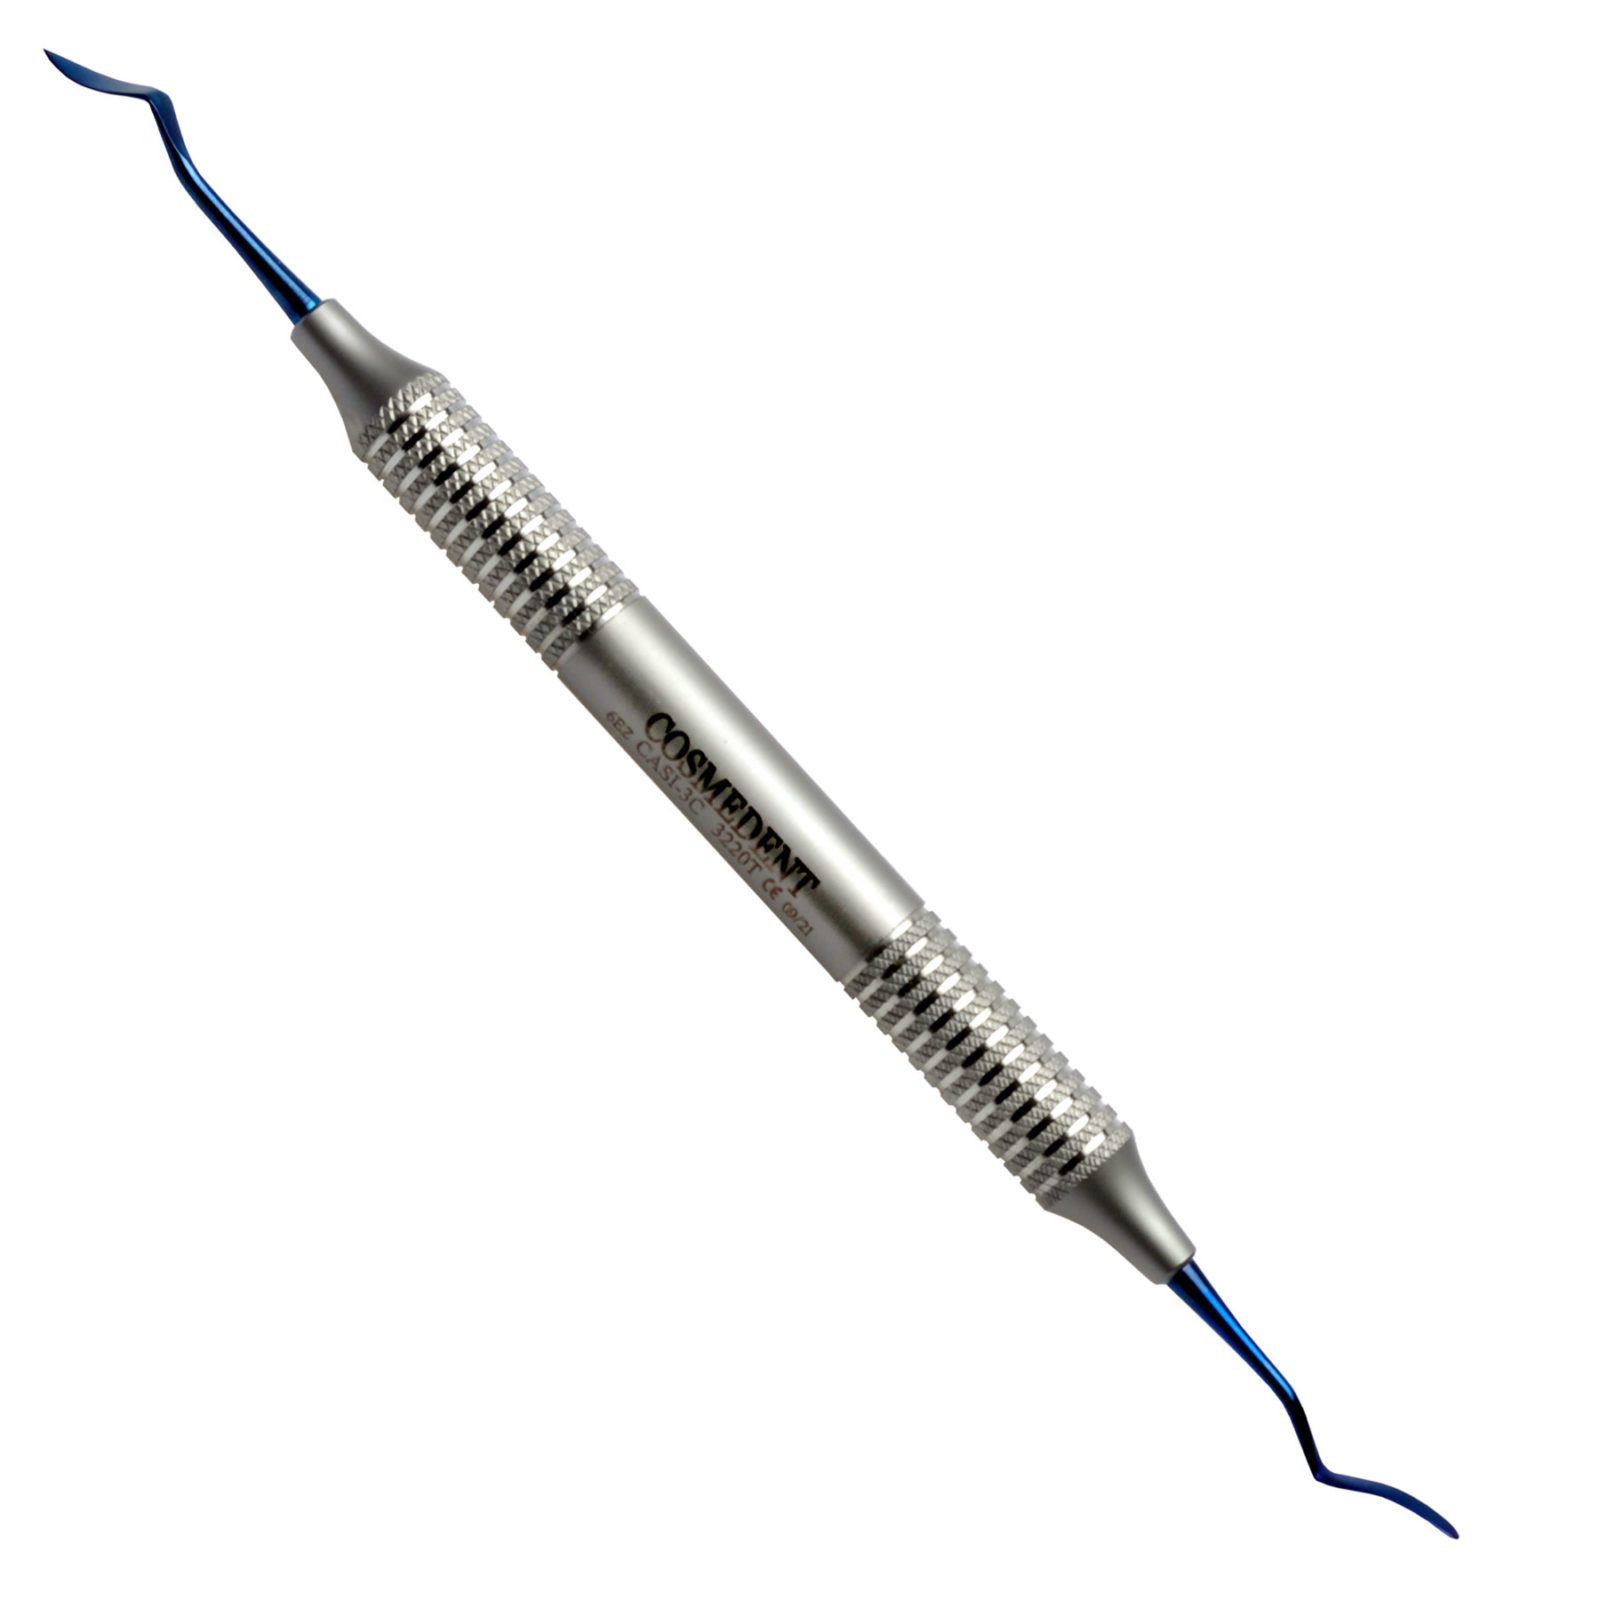
Characteristics:
Expert tip
The titanium coated instruments are more expensive than the stainless steel instruments and must be handled with more caution.
These instruments should only be used for composite placement and manipulation and absolutely should not be used for other dental procedures, such as cord packing or cement removal.
Titanium coated instruments should be kept clean with alcohol gauze during use and must have any existing composite on the instrument removed prior to autoclaving, as residual composite will become ‘baked’ on to the instrument creating a ‘sticky’ sufrace.
Jeremy Peyser, DDS
DOT Premium Member, Survey Response
3. Diamond-Like Carbon (DLC) Instruments
Characteristic:
Expert tip
Like titanium coated instruments, the DLC instrument should be handled with care so as to avoid scratching the surface coating. Alcohol gauze should be used to clean the instrument during use and prior to autoclaving to remove any residual composite.
These instruments, like their titanium counterparts, should not be placed into an ultrasonic cleaner as the vibration may cause scratching of the instrument blades as the instruments rub against each other.
These instruments, like their titanium counterparts, should not be placed into an ultrasonic cleaner as the vibration may cause scratching of the instrument blades as the instruments rub against each other.
4. Teflon or Plastic/Resin Instruments
Characteristics:
Expert tip
These instruments are similar to the DLC and titanium coated instruments as they should only be used for composite placement and contouring.
Care in the use and cleaning of these instruments are critical for their longevity.
Care in the use and cleaning of these instruments are critical for their longevity.
5. Plastic/Resin-Based Instruments
Expert tip
Plastic or resin based instruments are another attempt to create a ‘stick-free’ composite instrument surface to prevent ‘pull-back’ of the composite resin.
Disposable tips or blades may be an advantage for some practitioners. These plastic instruments, in the author’s opinion, are not ideal for manipulating the composite resin into the interproximal zones or into subgingival margins
Disposable tips or blades may be an advantage for some practitioners. These plastic instruments, in the author’s opinion, are not ideal for manipulating the composite resin into the interproximal zones or into subgingival margins

Characteristics:
Expert tip
Regardless of the instrument used by the clinician, the dental team must be steadfast to remove any composite material remaining on the instrument prior to heat sterilization.
Composite material that is left on the instrument during the heat sterilization may become permanently ‘stuck’ to the instrument, creating adhesive zones when working with the composite on the tooth.
Additionally, there must be care that the instrument blades do not become scratched or scuffed, as these blemishes will create areas where composite is more likely to stick, despite the surface treatment.
6. Brushes
Characteristics:
Expert tip
Select the right shape and size of brush for the particular tooth that is being restored.
Avoid using inexpensive disposable brushes as the bristle size and shape may be inappropriate for the refined material placement and contouring needed with composite restorations.
Avoid using inexpensive disposable brushes as the bristle size and shape may be inappropriate for the refined material placement and contouring needed with composite restorations.
Choosing the Right Composite Instruments Check List:
Dennis Hartlieb, DDS, AAACD
Share this page
Thank you!
Latest from our blog
