
DR. DENNIS HARTLIEB
Blocking out the metal post with pink opaque

Blocking out the metal post with pink opaque
I believe that we are fortunate to have such wonderfully esthetic dental materials at our fingertips these days – from composite to lithium disilicate to zirconia, tooth colored restorative materials have universal acceptance in the dental marketplace. As the demand for natural looking dentistry has increased, our manufacturers have answered this call.
While we have these great esthetic materials available today, not so long ago we were routinely restoring anterior teeth with metal post and cores, and porcelain-fused-to-metal crowns.
While we have these great esthetic materials available today, not so long ago we were routinely restoring anterior teeth with metal post and cores, and porcelain-fused-to-metal crowns.

Certainly master ceramists and highly skilled dentists could, and still can, create relatively esthetic results with metal based materials. Esthetic success for the average clinician and dental laboratory technician are however, limited. Dentistry, professionals and patients alike, became immune and complacent to this cosmetic compromise until recently. It used to be ok for crowns to look artificial and not resemble natural teeth. But now the stakes are higher.
Our patients’ demands are increasingly heightened due to many influences, including media, marketing, and social media.
Given our patients’ demands, we are often pressed into finding ways to create esthetic restorations in highly challenging areas. One case in point, and the one that we will review today, is when we have an existing metal post-and-core on an anterior tooth that needs crown replacement – which is especially valuable on a patient with high esthetic demands.
Ideally the metal post and core is removed and replaced with a tooth colored post and core material, either direct or indirect. There are circumstances, however, where it may be difficult or impossible to safely remove the existing post and core without damaging the root structure.
Ideally the metal post and core is removed and replaced with a tooth colored post and core material, either direct or indirect. There are circumstances, however, where it may be difficult or impossible to safely remove the existing post and core without damaging the root structure.
In these situations, where the metal post and core cannot be removed, the dentist has a couple of options.
1- The first option is to leave the metal post and core as it is and use a highly opaque crown material to block out the shine thru of the post/core.
The two crown material options commonly considered today are either using metal (with an opaquer over the surface), or a dense, highly opaque zirconia based restoration. In my experience, the dental technicians that I routinely work with no longer use metal based restorations for esthetic situations due to the inherent challenges in the laboratory technique.
For highly esthetic cases, my technicians will typically utilize zirconia based restorations where blockout is required. As great of a material that zirconia is, we often find the final restorations is not ideal. The crowns can turn out low in value, or just not bright enough.
There remains a ‘shine-thru’ effect even though the ceramist is using an opaquing zirconia material for the basis of the crown. In an effort to completely block out the dark post and core, the restoration is overly opaque, again not ideally esthetic in the final result. In either case the shade can be corrected, but the final esthetic result is limited due to the inappropriate value, or brightness of the restoration. It is because of this shine-thru, and the challenges for the ceramist, that I prefer to block out the metal at the tooth preparation.
2- The second option is to block out the metal at the tooth preparation.
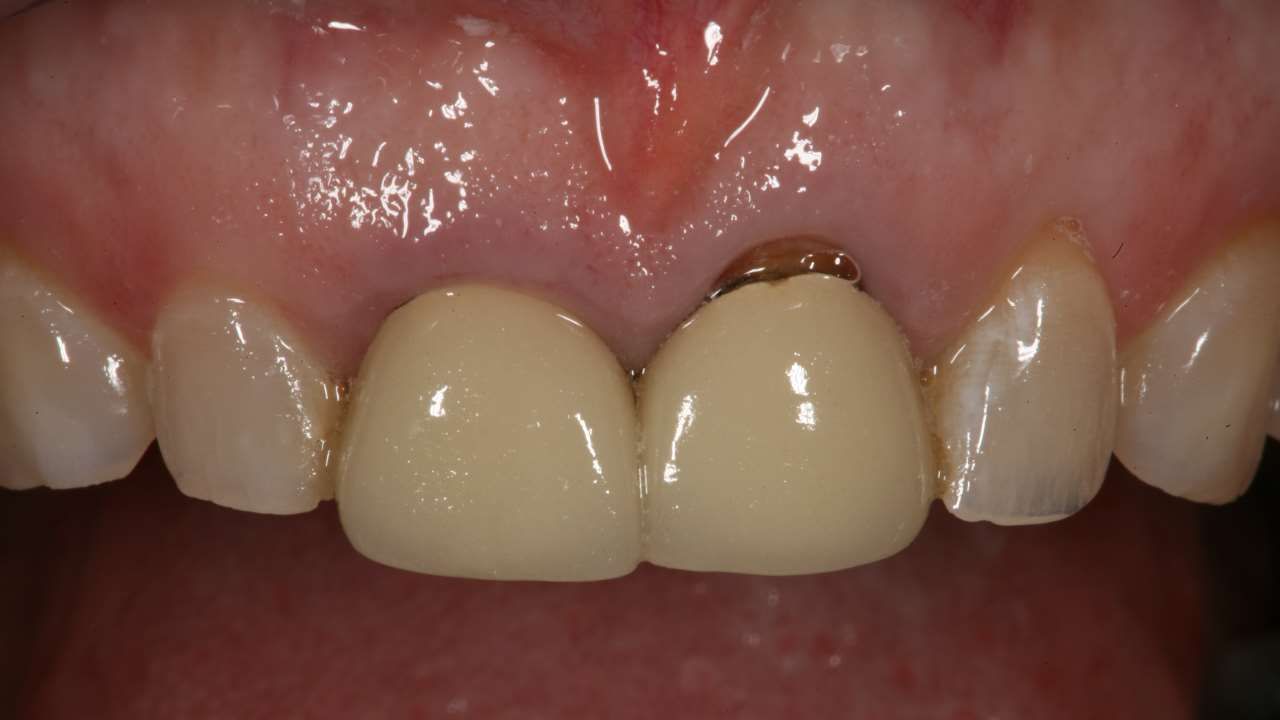
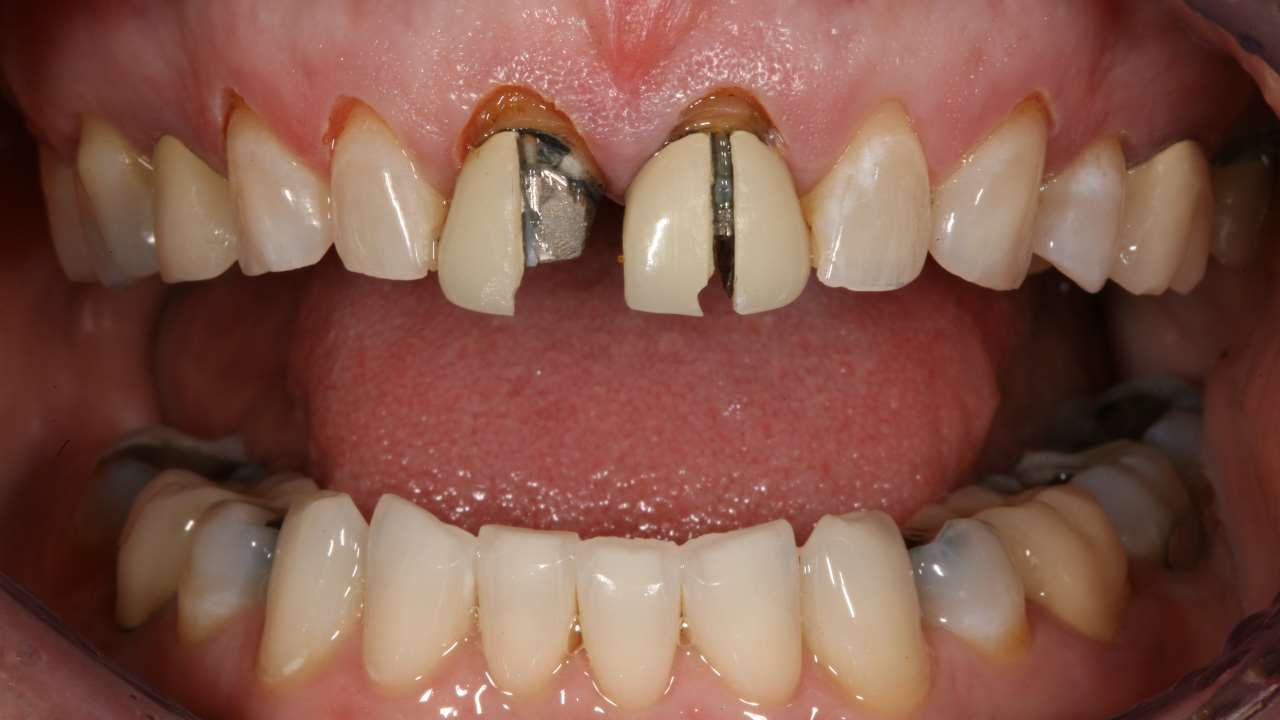
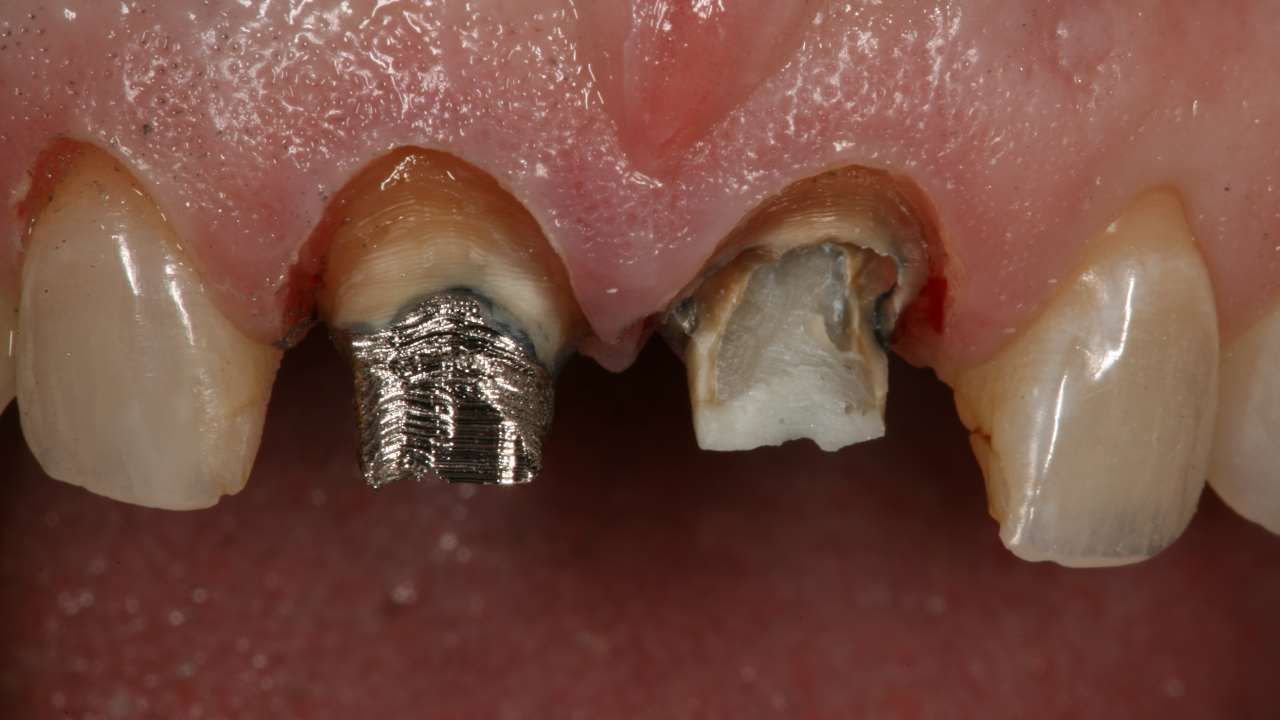
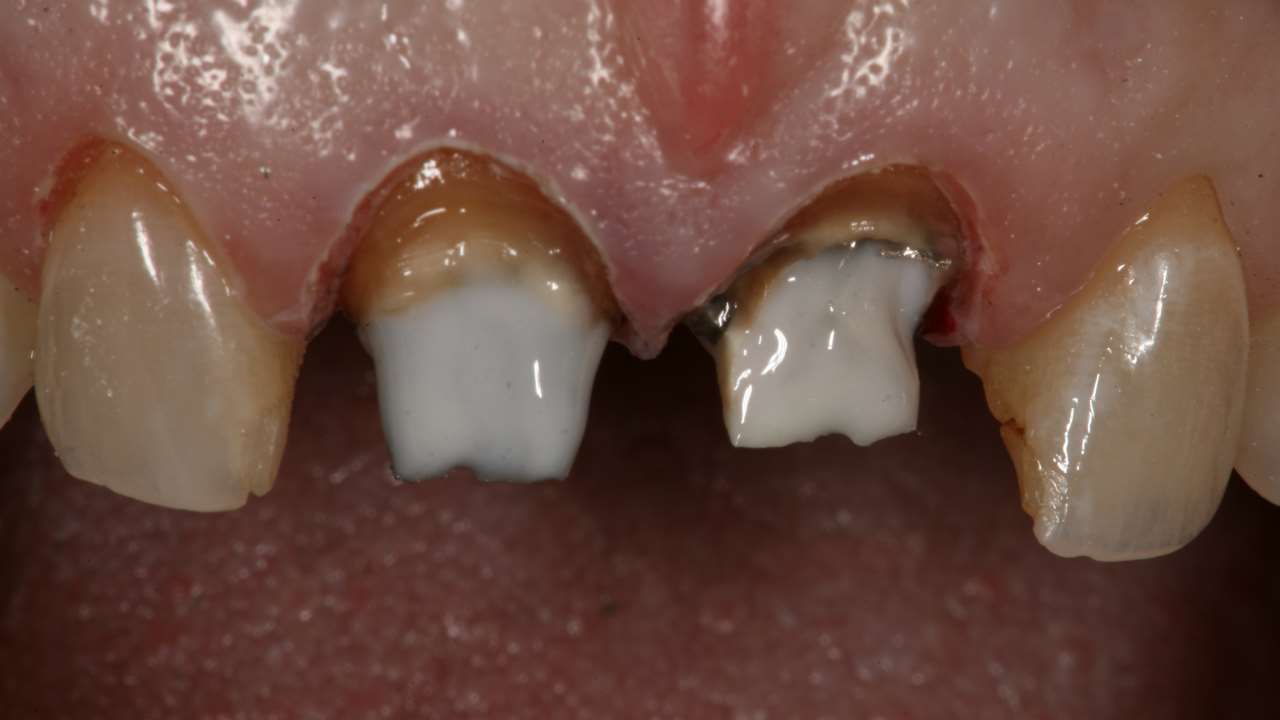
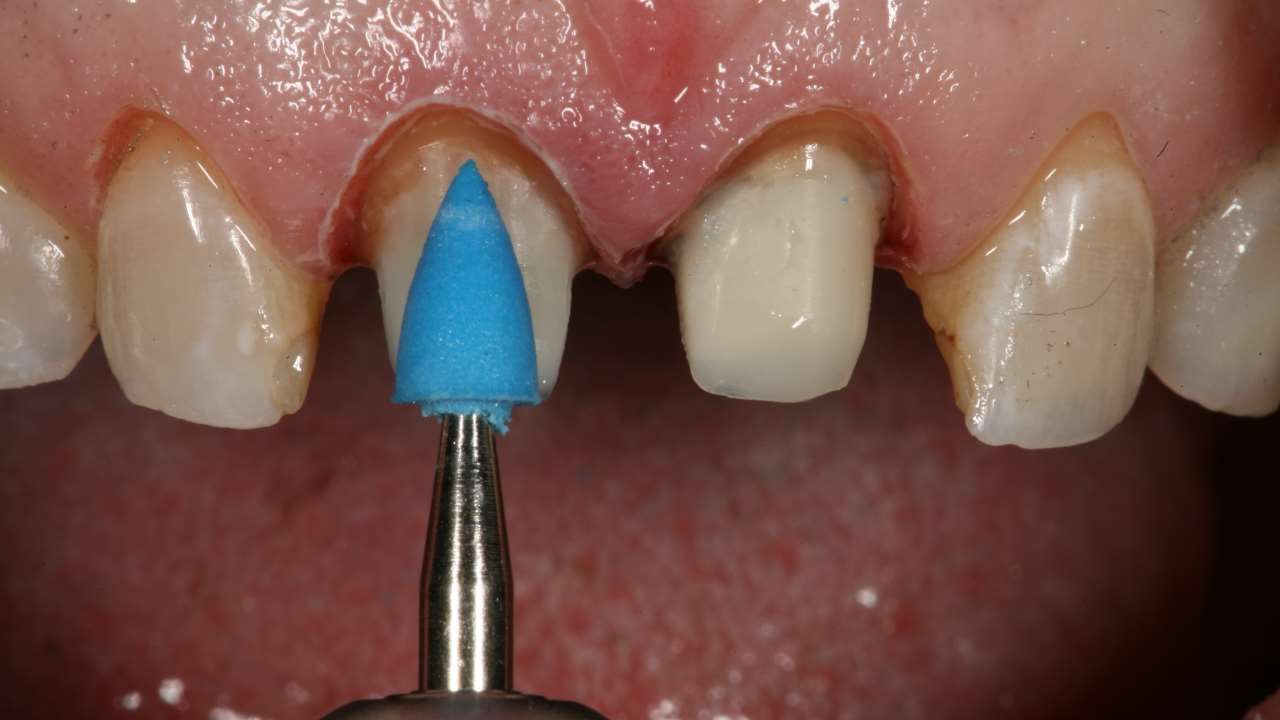
In the case that I am sharing with you today, the existing failing crowns on teeth #8 and #9 were removed exposing two very dark tooth abutments. I felt it was too risky to remove the existing cast post and core on the right central incisor, as the post was quite large with thin remaining root structure walls.
Our treatment plan was to restore the central incisors with all-ceramic crowns and use prototype bonding to enhance the esthetics of the other teeth in the esthetic zone. You’ll note in this case that Fran has a very ‘gummy’ smile. I was able to create a more pleasing smile by performing a ‘gum lift’. Read my blog post on predictable esthetic crown lengthening to learn more.
Our treatment plan was to restore the central incisors with all-ceramic crowns and use prototype bonding to enhance the esthetics of the other teeth in the esthetic zone. You’ll note in this case that Fran has a very ‘gummy’ smile. I was able to create a more pleasing smile by performing a ‘gum lift’. Read my blog post on predictable esthetic crown lengthening to learn more.
I believe my ceramist is able to create the most natural esthetics with lithium disilicate (eMax, Lisi), rather than with zirconia, so I absolutely needed to block out the metal post and dark tooth structure.
With the crowns removed, the dark post and core of #8 and the dark tooth of #9 are realized. The post and core on #8 was stable and intact, and outside the esthetic nature of the metal post, the post and core was quite serviceable. Again, due to the diameter of the post, I opted to leave the post and core in place and block out the metal prior to impressions for the final crowns.
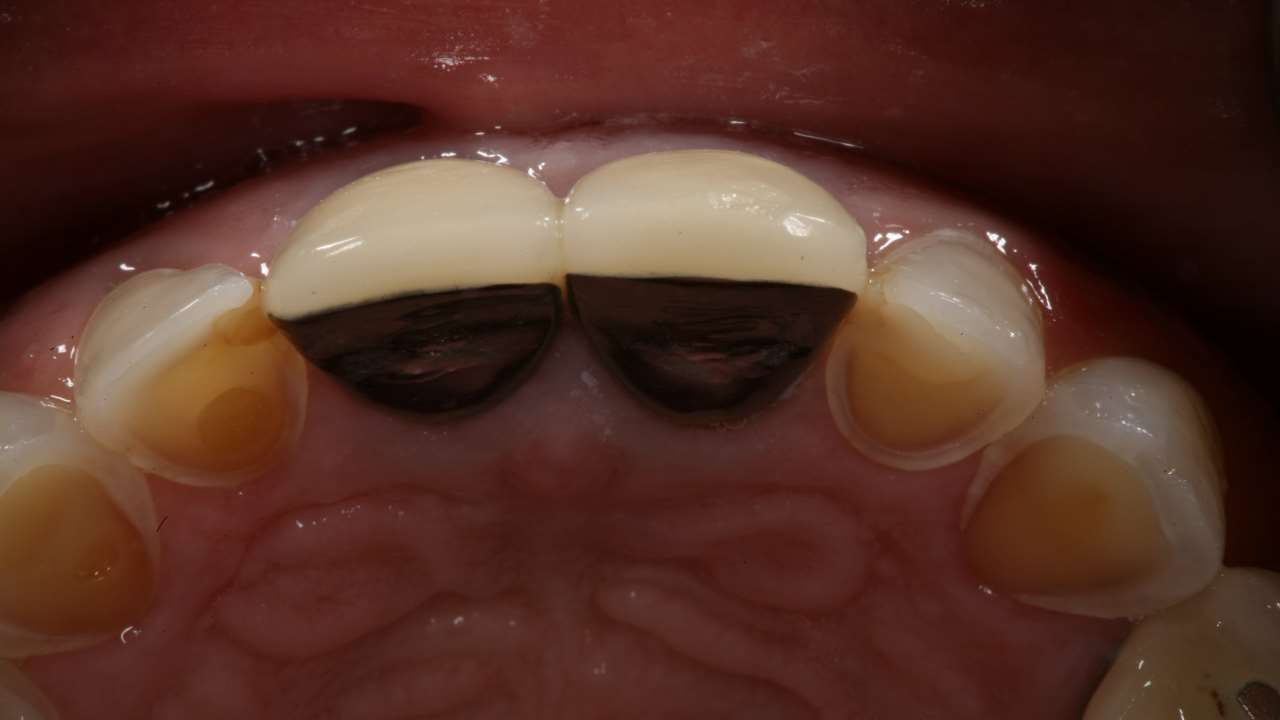
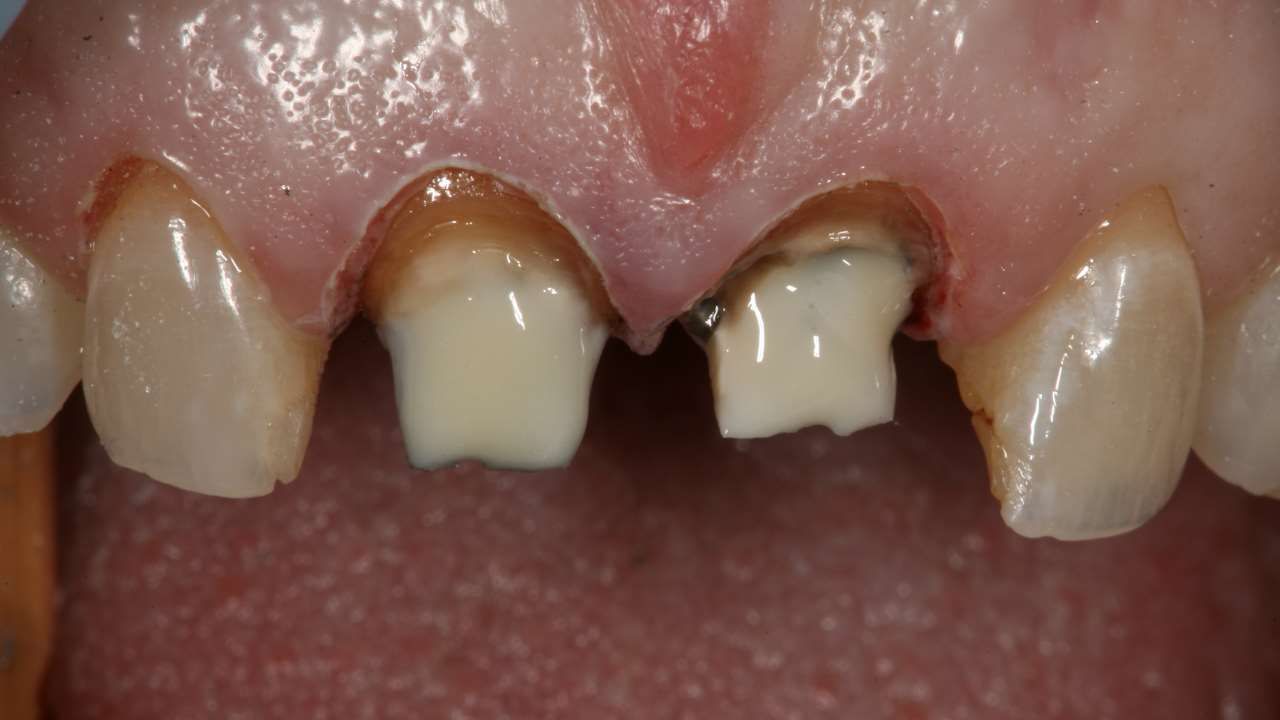
The technique that I use for blocking out metal is a little different than when I block out a natural tooth (read my ‘Masking the Dark Tooth with Direct Resin’ blog). When I am blocking out metal, especially grey metal, I need to block out the darkness entirely. Pink Opaque (Cosmedent) is used as the first layer in masking the metal because of how the pink neutralizes the dark grey of the metal.
The reason that pink neutralizes the grey is based on the Munsell color system, but quite frankly, it’s a little above my head. I just know that it works. If you’ve used white opaque in the past to block out metal, then you probably had the same experience that I did; if I used a little, then the white turned grey but if I used a lot, the block out was too white and opaque, and impossible for me to block out in the final restoration.
The reason that pink neutralizes the grey is based on the Munsell color system, but quite frankly, it’s a little above my head. I just know that it works. If you’ve used white opaque in the past to block out metal, then you probably had the same experience that I did; if I used a little, then the white turned grey but if I used a lot, the block out was too white and opaque, and impossible for me to block out in the final restoration.
Let me walk you through the step-by-step technique.
After removing the PFM crowns, I slightly overprep on the facial to give me a little more restorative space. If there is enamel, I’ll use phosphoric acid as the first step in the adhesion technique. More often than not though, I’ll be entirely in dentin in these cases so I can use a self-etch adhesive, like Clearfil SE from Kurrary. Here is the first part of the technique:
1. Microetch (sand blast) with 25-50 micron aluminum oxide
2. Rinse and dry
3. Use self-etch primer on all tooth structure, 20 seconds, air dry
4. Place a metal primer on the metal post and core and air dry
5. Place the ‘bond’ (2nd bottle of Clearfil SE) over the primed tooth structure and post and core.
6. Light cure 20 seconds
Ok, now we are ready to start blocking out the post and core and the dark tooth structure, so a few more steps:
7. Using an artist’s brush, paint a thick layer of pink opaque (Creative Colors, Cosmedent) over the metal, feathering onto the tooth structure and light cure, 10 seconds.
8. Evaluate to see if there is still metal shine thru – if so, add another layer, though thinner to complete masking of the metal. Light cure 10 seconds.
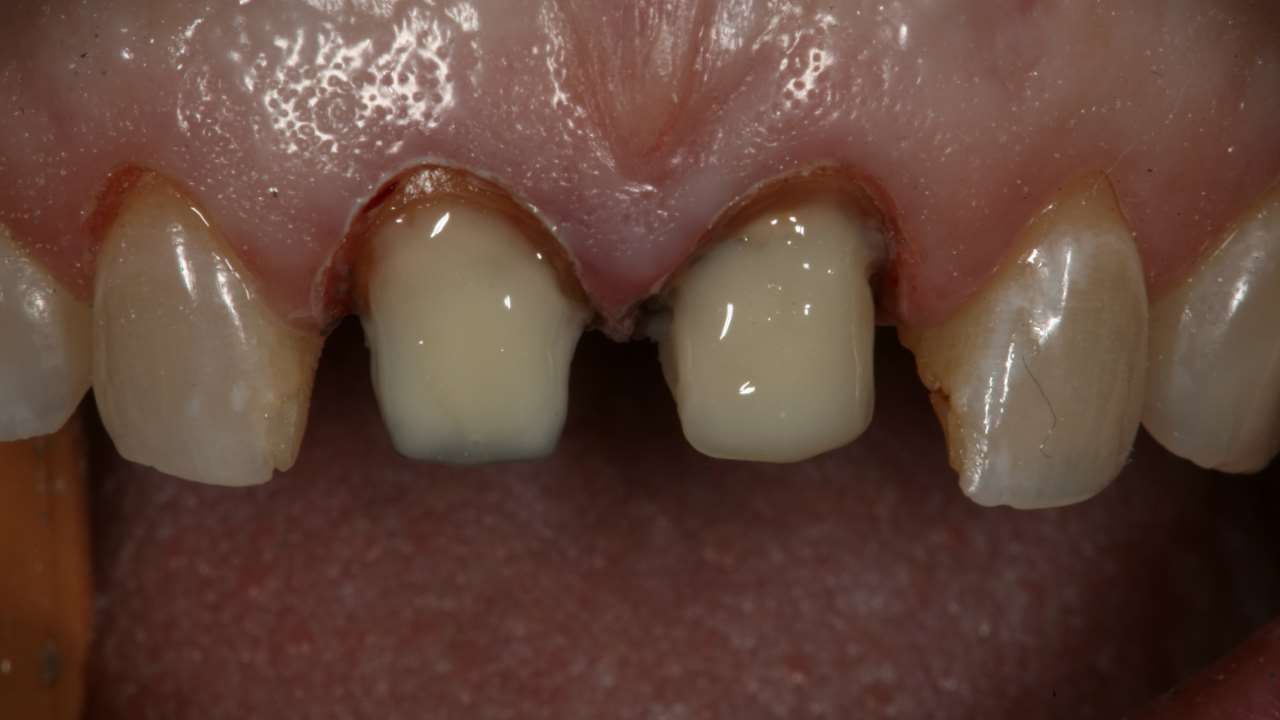
9. Using the same artist’s brush, cleaned with an alcohol gauze, place a layer of the opaquer (Creative Color, Cosmedent) of the Vita shade that you want for your tooth prep (i.e. A2). Light cure 10 seconds.
10. Place a thin layer of dentin composite (Renamel Hybrid, Cosmedent) to complete the proper tooth form. Light cure 30-60 seconds for final cure.
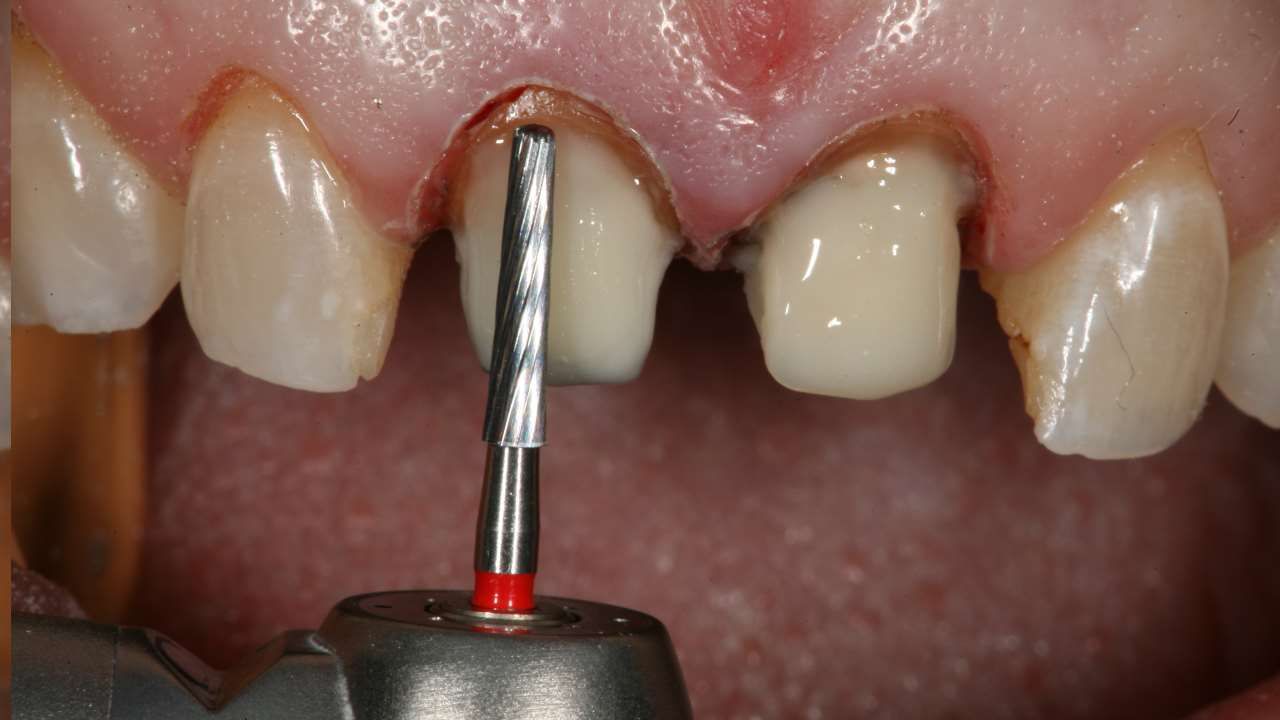
11. Reprep and polish for final crown preparations.
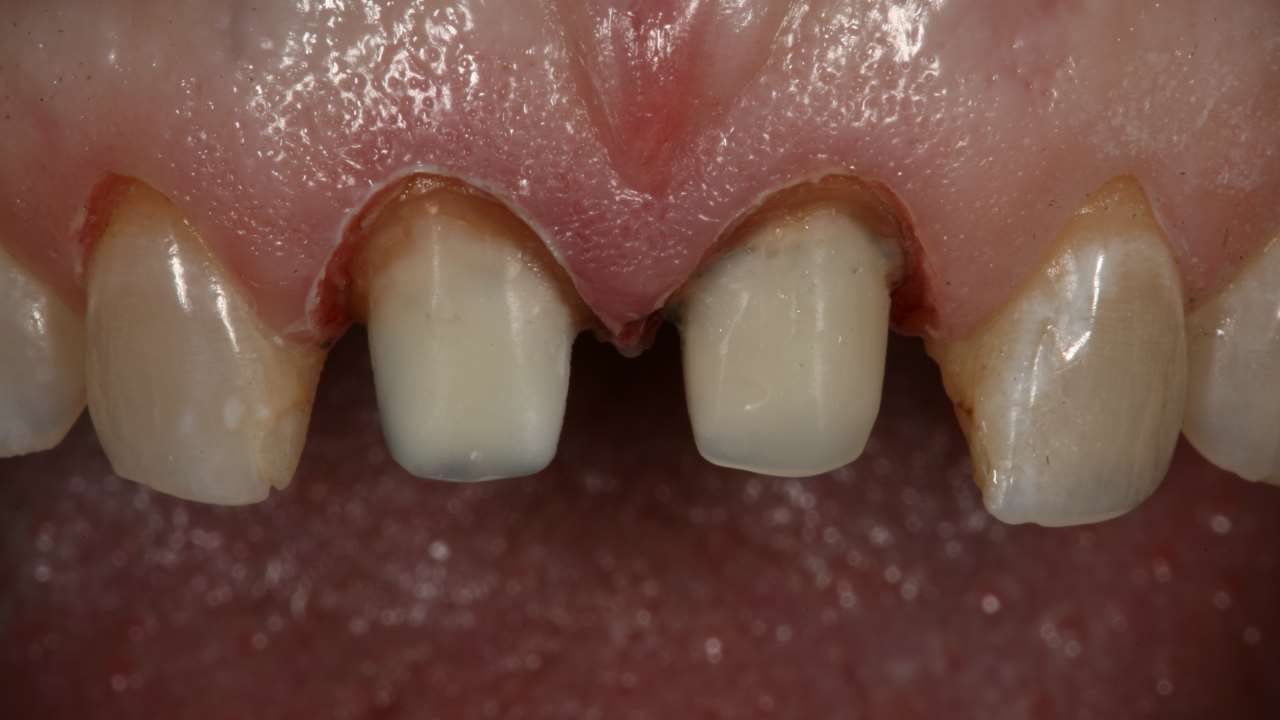
Using these layers, with the pink opaque to raise the value, I was able to create a natural tooth color substrate that will make the porcelain crown fabrication very predictable.
That’s it for the technique. Touch base with any questions!
Yours for better dentistry,
That’s it for the technique. Touch base with any questions!
Yours for better dentistry,
Dennis Hartlieb, DDS, AAACD
DOT Founder
Join 3,500+ dentists who get monthly restorative dentistry tips
Share this page
Latest from our blog

Our vision is to provide online continuing education workshops and mentorship that are comprehensive for dentists learning at all career levels. DOT is developed for dentists that love to learn online.
CONNECT
Materials Included
Light Brown tints, Enamelize, Unfilled Resin Flexidiscs, Flexibuffs 1/2", #1 artist’s brush, Silicone Polishing Points, IPC Off Angle Short Titanium Coated Composite Instrument
Materials Needed, not Included
- Loupes
Follow along
You are Registered
We’re excited to have you join us! You’ll receive email reminders at with the link to join this event.
If you have any questions in the meantime, feel free to reach out to us at dot@dothandson.com—we’re here to help!
Day 1 (8 - 4 pm CST)
-
Erosion and wear – the why and the how
-
Adding length to teeth – when is it safe
-
Opening VDO to compensate for lost tooth structure – where to begin
-
Records visit and key points you need to understand before you start
-
The smile – the 7 strategic points to consider when evaluating the smile
-
Anterior tooth shape, morphology
-
Clinical case review
-
Upper Putty matrix construction
-
Build lingual incisal wall with putty matrix #6 - #11/ Upper anteriors
-
Full contour build-up #6, #7, #8, #9, #10, #11, shape and polish/ Upper anteriors
Day 2 (8 - 2 pm CST)
-
Who – which patients are candidates
-
Why – explaining to patients the value of the prototype
-
How – step-by-step techniques to maximize predictability, efficiency and success
-
Getting to Yes: conversations with patients about esthetic and reconstructive dentistry
-
The ‘Smile Preview’ – techniques to show the possibilities
-
Lower Putty matrix construction
-
Build lingual incisal wall with putty matrix #22 - #27 / lower anteriors
-
Build-up #22 - #27, shape and polish / lower anteriors
-
Build-up lower occlusal posteriors
-
Demonstration of Smile Preview
Upcoming Virtual Workshops
Write your awesome label here.
December 11 & 12, 2025
CPR for the Worn Dentition (16 CE)
Write your awesome label here.
January 29-30, 2026
Porcelain Veneer Cementation Workshop (14 CE)
Write your awesome label here.
March 27, 2026
Esthetic and Functional Success for Diastema Closure (8 CE)
Write your awesome label here.
May 15, 2026
From Break to Beautiful: Flawless Class IV Resin Restorations (8 CE)
Write your awesome label here.
June 19, 2026
Mastering Intraoral Scanners and Digital Workflow for the Dental Team (4 CE)
Write your awesome label here.
September 25, 2026
Veneering the Dark Central Incisor - Conservative Direct and Indirect Restorative Strategies (8 CE)
Write your awesome label here.
October 30, 2026
3D Printing for the Restorative Dentist
Write your awesome label here.
December 11, 2026
Injection Molding Workshop (8 CE)
Write your awesome label here.
Study Club
Join five in-depth virtual meetings held on Thursday evenings throughout the year. Engage in detailed case presentations, discuss curated research articles, and exchange valuable tips with fellow dentists.
-
01/22/2026
-
04/09/2026
-
06/11/2026
-
10/15/2026
-
12/10/2026
Write your awesome label here.
Coffee & Donuts
Kickstart your Friday mornings with informal sessions and discuss patient treatments, practice management, and receive feedback on your cases.
-
01/16/2026
-
02/13/2026
-
03/20/2026
-
04/10/2026
-
05/08/2026
-
06/05/2026
-
08/21/2026
-
10/09/2026
-
11/20/2026
-
12/10/2026
Popular On-Demand Courses
Write your awesome label here.
Injection Moulding Techniques (3 CE)
Simple, predictable, systematic foundation for you to start your journey with injection moulding
Write your awesome label here.
Advanced Techniques in Composite Veneers (6 CE)
Take control of aesthetic cases in your practice, whether you are enhancing smiles with direct resin veneers or creating provisional restorations for indirect cases.
Write your awesome label here.
A Realistic Perspective on Occlusal Appliances (3 CE)
Learn how to design, fabricate, and manage occlusal appliances with confidence through practical guidance and real clinical case examples.
Write your awesome label here.
Bicuspid Veneer and V-Onlay Preparation (3 CE)
Gain expertise in ‘prep-less’ veneers, buccal cusp reduction, and margin placement methods to enhance your clinical outcomes.
Write your awesome label here.
Class IV Composite Restoration – Polychromatic Approach (3 CE)
This on-demand course covers material selection and advanced layering techniques to help you create natural-looking, long-lasting restorations that set you apart.
Write your awesome label here.
EXOCAD: Foundation (2 CE)
Gain the skills to confidently navigate Exocad, build patient cases, and streamline your workflow using time-saving techniques and presets.
Write your awesome label here.
Class II Direct Resin (3 CE)
Master a reliable approach to Class II restorations by learning how to create ideal proximal contacts that enhance both the strength and aesthetics of your work.