One of the challenges that I have experienced in the field of cosmetic dentistry is when I am working with a surgical colleague for esthetic crown lengthening cases. Now, just for clarification, esthetic crown lengthening is different than functional crown lengthening.
Functional crown lengthening is generally about creating enough tooth structure for the dentist to be able to predictably restore the tooth – to create ferrule. FCL is often be related to tooth fracture or deep caries, and the procedure can involve any, including all, of the surfaces of the root.
Esthetic crown lengthening, however, is typically related just to the facial, and sometimes interproximals, of the anterior teeth. While we may gain tooth structure for our restorative procedures, the goal of the crown lengthening is to set the gingival margin position in an improved esthetic position.
In the past, I would either create a surgical guide (vacuform with idealized cervical margin position created), or give measurements from the incisal edge of the tooth/teeth, to help the surgeon during the procedure.
Unfortunately, I have found the results to vary, I think mostly because it can be difficult for the surgeon to accurately gauge when measuring during the surgery. With the surgical guide, the fact that the guide is several millimeters away from the bone, angulation issues with the handpiece or chisel around the guide will influence the actual amount of bone removed.
Based on less than ideal results, I have designed a technique that I believe creates more control for the restorative dentist with these esthetic crown lengthening cases. The technique that I am sharing is the procedure I use when anterior teeth need crowns, or have existing crowns that need replacement.
Importantly, this technique is applicable for those who do their own esthetic crown lengthening procedures, and for those who refer to surgical specialists, like their periodontists. The following is the protocol that I use in my office:
1- After records are taken of the patient (study cast impressions (analog or digital), x-rays, photographs, and facebow and centric bite recording for articulator mounting), the patient is rescheduled for provisionalization and gingivectomy.
2- A wax-up is completed on the mounted casts and a matrix is prepared for provisional fabrication at the patient’s next visit.
3- The patient is referred to the periodontist for evaluation for crown lengthening. Communication is critical with the restorative dentist and the periodontist to help the periodontist understand the staging of the patient’s treatment. The patient is scheduled for a surgical appointment with the periodontist 10-14 days after my next appointment with the patient.
4- At the next appointment with me (the restorative dentist), this is my workflow:
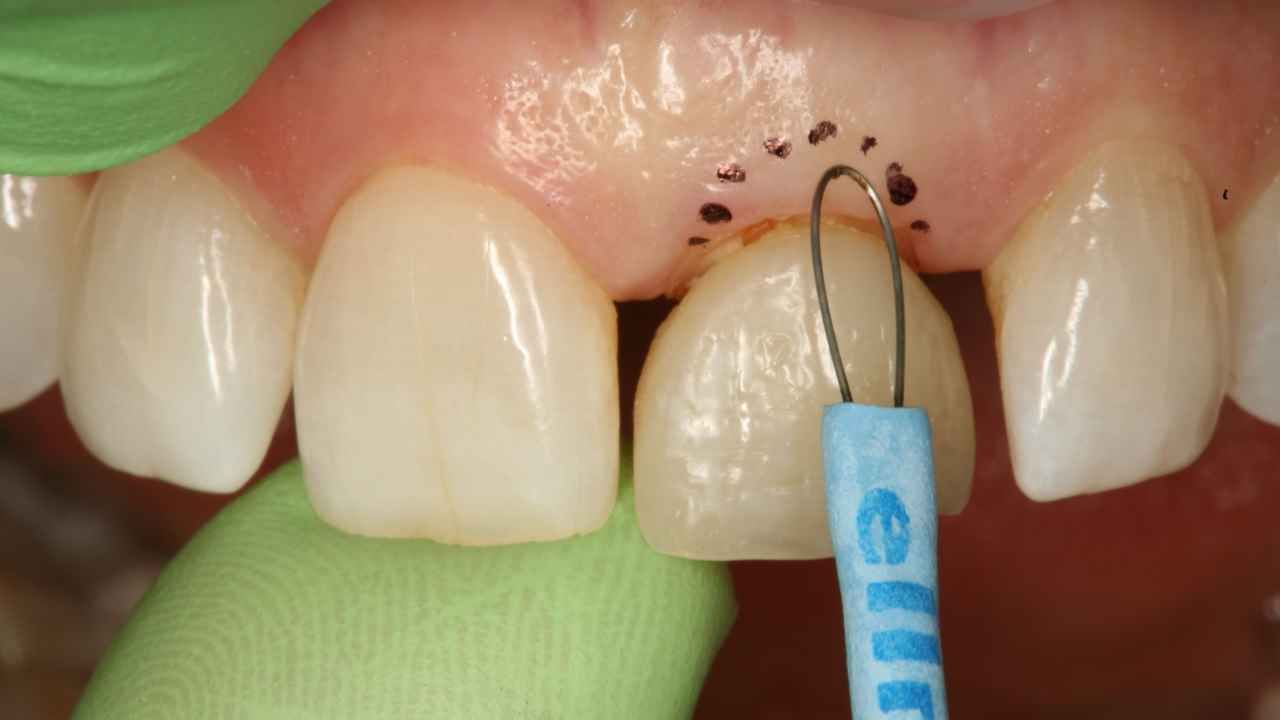
- The gingival tissue is dried and a ‘Sharpie’ marker is used to outline desired soft tissue contour changes prior to patient anesthesia. Photographs are taken and evaluated and discussed with the patient. If all agree on the proposed soft tissue change, the patient is anesthetized with a local anesthetic.
- A gingivectomy (GV) is performed to create the ideal height and contour to the soft tissue, preferably with the existing dentistry in place. The gingivectomy can be completed using electro-surgery, as I have in this treatment case, or it can be done with a soft tissue laser or a scalpel. The goal of this step is to idealize the soft tissue position, ignoring the bone height under the gum line. Invasion of biologic width is anticipated.
- The current restoration is removed and the tooth is prepared for the provisional crown, at the new gingival margin position. If build-ups are necessary, they are completed at this time.
- The provisional is fabricated and cemented.
5- The patient is seen post-operatively about 1 week after the GV. At this appointment, I am evaluating the soft tissue height and contour with the patient when they are no longer numb. The value of this appointment is that I can now give final instructions to my periodontist on what I want them to do at the upcoming surgical visit.
- If the soft tissue is ideal, I instruct the surgeon to reflect a flap, and reshape the bone so that there is a 3mm zone from the established provisional margin to the osseous crest to allow for the biologic width. Now, the surgeon may need to make changes based on clinical factors such as bone thickness (thin bone, err on less removal) and the root position (if the root is palatally positioned, more osseous recontouring may be necessary)
- If I did not remove enough soft tissue at my previous appointment, and the gingival margin of the provisional is too coronal, I will ask for increased osseous recontouring by the surgeon. However, I do not want the surgeon to remove the gum tissue – I personally want to control the soft tissue final position. If for instance, on my post-op evaluation I note that I should have resected the gum tissue an additional 1 mm to level the gingival margins, then I would have my surgeon osseous crown lengthen 4 mm, instead of 3 mm from the free gingival margin. After the patient has healed from the osseous surgery, and prior to final impressions, I will then go and trim the excess tissue away to create ideal contour and shape.
- If I took away too much soft tissue, then I would ask the surgeon to remove less bone, and also to reshape the facial contour of the provisional (flatten the facial emergence profile of the provisional.
6- The patient returns to my office 6-8 weeks later for evaluation. At this appointment, the tissue should look ideal, but typically not have a normal probable sulcus. At 4-6 months, I’ll have the patient return for gentle probing to see if the sulcus has renormalized. Only when the patient has a probable sulcus, without bleeding, can we move to impressions for definitive restorations.
In the treatment case provided, the patient was supposed to have the osseous surgery with my periodontist a couple of weeks after the provisionalization appointment. Unfortunately, the patient cancelled that appointment and lost contact with our practice. When she returned over a year later, the provisional had been recemented at another practice and there was a fracture on the distal incisal edge of the provisional. I counseled the patient on the procedure (again) and the patient was reappointed with both me, and the surgeon, for a new provisional (and GV) and follow-up osseous surgery with the periodontist. The patient insisted that she would follow thru with treatment this time.
The patient is currently in a holding pattern after her surgery - I’ll update her case when we move to the definitive restoration. I hope that this helps for those esthetic crown lengthening cases where there are provisionals to be placed…in the future, I’ll write a separate blog on cases where there won’t be restorative dentistry until after the crown lengthening and how I communicate with my surgeon for those situations.
That’s it for now – your for better dentistry,