This patient has a crazy story - when he was a kid he was just walking home from school one day and was shot by another kid with a BB gun - right into tooth #8! He was incredibly lucky that it was his tooth and not an eye, but how crazy is that?! Anyhow, tooth #8 was crowned, and since that time, he has also had #9 crowned.
Gingivectomy #8, remove crowns #8 and #9, provisional crowns #8 and #9
Patient to be seen by periodontist for osseous reshaping #8 about 2-3 weeks following provisionalization
Healing of crown lengthening 3-6 months
Final crowns #8 and #9
Now, the patient is very cautious and is not certain that he wants to have the crown lengthening done (he understands that there would be an esthetic improvement, but financially is conservative).
So, we are changing our treatment strategy:
1. Remove crowns #8 and #9, provisional crowns #8 and #9, evaluation of tooth structure for functional considerations (ferrule) 2. Consultation with patient to review findings from appointment 1
Patient will decide between:
1. Have final crowns made at existing gingival margin positions 2. Follow thru with crown lengthening and treatment as outlined above
The patient understands that there will be a separate (additional) fee for me to go back and GV and reprep and retemp if he decides to have crown lengthening.
Karl came in a couple of days ago like we had discussed for treatment of the two maxillary central incisors.
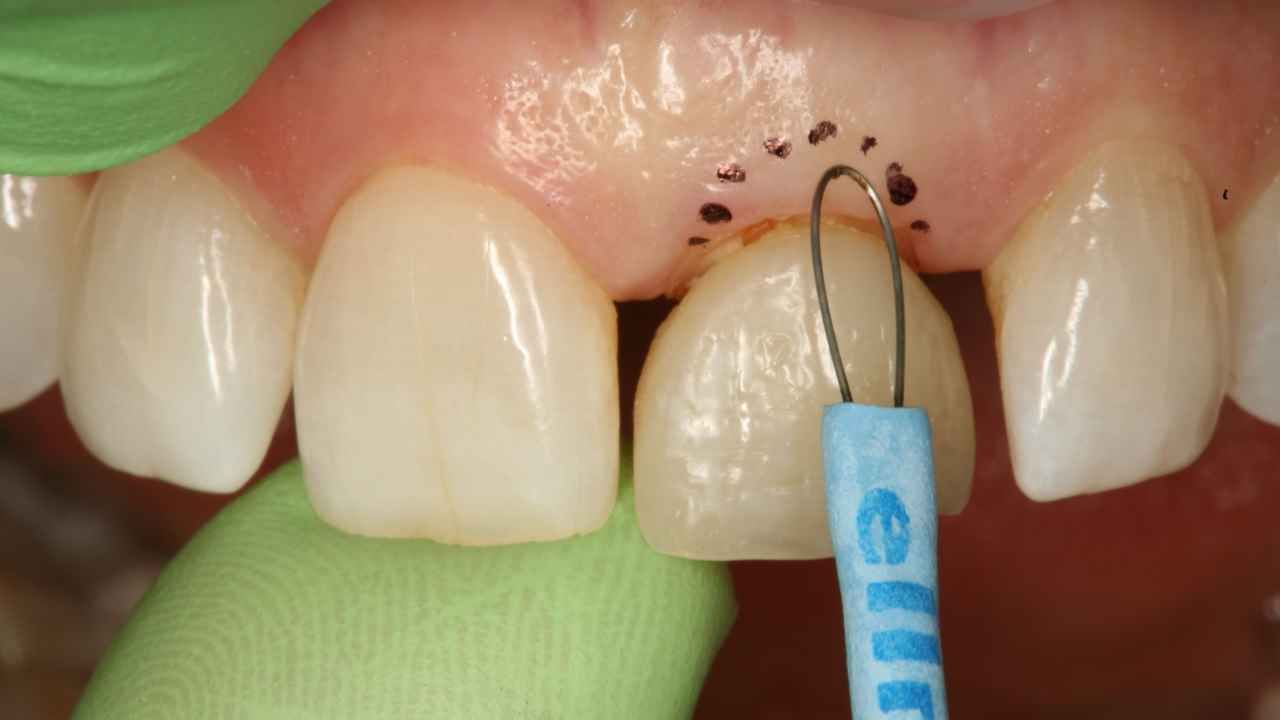
After local anesthesia, I removed the existing restorations. I then 'sounded to the bone' on the facial of #8, hoping that there was a deep sulcus, and we could look at potentially just doing a gingivectomy instead of full osseous procedure. No luck...sounding was just over 3 mm (2nd image).
I reprepped the teeth - full coverage restorations (3rd image), and placed the provisionals. I also, very quickly, did some prototype bonding on #10 to bring into alignment. In the smile preview pic, you will notice a cant in the patient's smile, so creating more symmetry in the length of #8 and #9, #10 was going to look to short, or more likely, the patient was going to think that #9 was too long.
So I etched, adhesive and placed composite on #10 to get a better smile blend for the patient.
Karl is returning next week (I think) for discussions about definitive treatment:
1. Leave tissues as they are 2. Crown lengthen for symmetry
Do you have any thoughts on this case before I see Kyle again?
Dennis Hartlieb, DDS, AAACD
DOT Founder
Join 3,000+ dentists who get monthly restorative dentistry tips
Brasseler: Fine Modified Flat-End Diamond Bur, ET9 FG Needle Fine 8 Blade Red Carbide Bur, 7408 OS1 FG Football Carbide Bur, Fine Needle Mosquito Diamond Bur, Medium Depth Cutting Diamond Bur, Feather Lite Polishers,Polishing Cups
Cosmedent: Universal Composite Renamel NANO Plus (A1), Renamel Microhybrid MWO, Ranamel Microfill A1, Renamel Hybrid flowable A1, Light Incisal, A1 Opaquer, White Opaquer,
Light Brown tints, Enamelize, Unfilled Resin Flexidiscs, Flexibuffs 1/2", #1 artist’s brush, Silicone Polishing Points, IPC Off Angle Short Titanium Coated Composite Instrument
Materials Needed, not Included
Loupes
High Speed
Slow Speed
Curing Light
Alcohol Gauze
Boley Gauge
Floss
Teflon tape
Mylar strips
Follow along
You are Registered
We’re excited to have you join us! You’ll receive email reminders at with the link to join this event.
If you have any questions in the meantime, feel free to reach out to us at dot@dothandson.com—we’re here to help!
Day 1 (8 - 4 pm CST)
Erosion and wear – the why and the how
Adding length to teeth – when is it safe
Opening VDO to compensate for lost tooth structure – where to begin
Records visit and key points you need to understand before you start
The smile – the 7 strategic points to consider when evaluating the smile
Build-up #22 - #27, shape and polish / lower anteriors
Build-up lower occlusal posteriors
Demonstration of Smile Preview
Purchase Your Kit & Endo Motor
Hands-On Kit
Click the link below to purchase your hands-on kit. It will be sent to you two weeks before the live event.
Endo Motor
Email luna@dothandson.com to request a loaner endo motor (needs to be returned) or to purchase outright.
Upcoming Virtual Workshops
Write your awesome label here.
December 11 & 12, 2025
CPR for the Worn Dentition (16 CE)
Write your awesome label here.
January 29-30, 2026
Porcelain Veneer Cementation Workshop (14 CE)
Write your awesome label here.
March 27, 2026
Esthetic and Functional Success for Diastema Closure (8 CE)
Write your awesome label here.
May 15, 2026
From Break to Beautiful: Flawless Class IV Resin Restorations (8 CE)
Write your awesome label here.
June 19, 2026
Mastering Intraoral Scanners and Digital Workflow for the Dental Team (4 CE)
Write your awesome label here.
September 25, 2026
Veneering the Dark Central Incisor - Conservative Direct and Indirect Restorative Strategies (8 CE)
Write your awesome label here.
October 30, 2026
3D Printing for the Restorative Dentist
Write your awesome label here.
December 11, 2026
Injection Molding Workshop (8 CE)
Write your awesome label here.
Study Club
Join five in-depth virtual meetings held on Thursday evenings throughout the year. Engage in detailed case presentations, discuss curated research articles, and exchange valuable tips with fellow dentists.
01/22/2026
04/09/2026
06/11/2026
10/15/2026
12/10/2026
Write your awesome label here.
Coffee & Donuts
Kickstart your Friday mornings with informal sessions and discuss patient treatments, practice management, and receive feedback on your cases.
01/16/2026
02/13/2026
03/20/2026
04/10/2026
05/08/2026
06/05/2026
08/21/2026
10/09/2026
11/20/2026
12/10/2026
Popular On-Demand Courses
Write your awesome label here.
Injection Moulding Techniques (3 CE)
Simple, predictable, systematic foundation for you to start your journey with injection moulding
Write your awesome label here.
Advanced Techniques in Composite Veneers (6 CE)
Take control of aesthetic cases in your practice, whether you are enhancing smiles with direct resin veneers or creating provisional restorations for indirect cases.
Write your awesome label here.
A Realistic Perspective on Occlusal Appliances (3 CE)
Learn how to design, fabricate, and manage occlusal appliances with confidence through practical guidance and real clinical case examples.
Write your awesome label here.
Bicuspid Veneer and V-Onlay Preparation (3 CE)
Gain expertise in ‘prep-less’ veneers, buccal cusp reduction, and margin placement methods to enhance your clinical outcomes.
Write your awesome label here.
Class IV Composite Restoration – Polychromatic Approach (3 CE)
This on-demand course covers material selection and advanced layering techniques to help you create natural-looking, long-lasting restorations that set you apart.
Write your awesome label here.
EXOCAD: Foundation (2 CE)
Gain the skills to confidently navigate Exocad, build patient cases, and streamline your workflow using time-saving techniques and presets.
Write your awesome label here.
Class II Direct Resin (3 CE)
Master a reliable approach to Class II restorations by learning how to create ideal proximal contacts that enhance both the strength and aesthetics of your work.
Sign in here or create a new account for free.Sign in here create a new account for free.