
DR. DENNIS HARTLIEB
Considerations for prosthetic replacement of the congenitally missing lateral incisor
Matching Composite to Porcelain
Minimally invasive dentistry. We hear the term all the time – but what does it mean. To each of us, it probably means something a little bit different. There are many examples of techniques to do minimally invasive dentistry, from ‘prepless’ veneers to ‘prep-less’ veneers. These are porcelain techniques that are populated by many dentists and dental laboratories to solve esthetic issues for our patients. Unfortunately, a lot of these ‘prepless’ cases look over contoured, or too bulky when placed, resulting in poor esthetics and soft tissue challenges. This bulk is especially notable at the cervical and gingival embrasures because if the porcelain is made too thin, the porcelain will fracture during try-in or delivery.
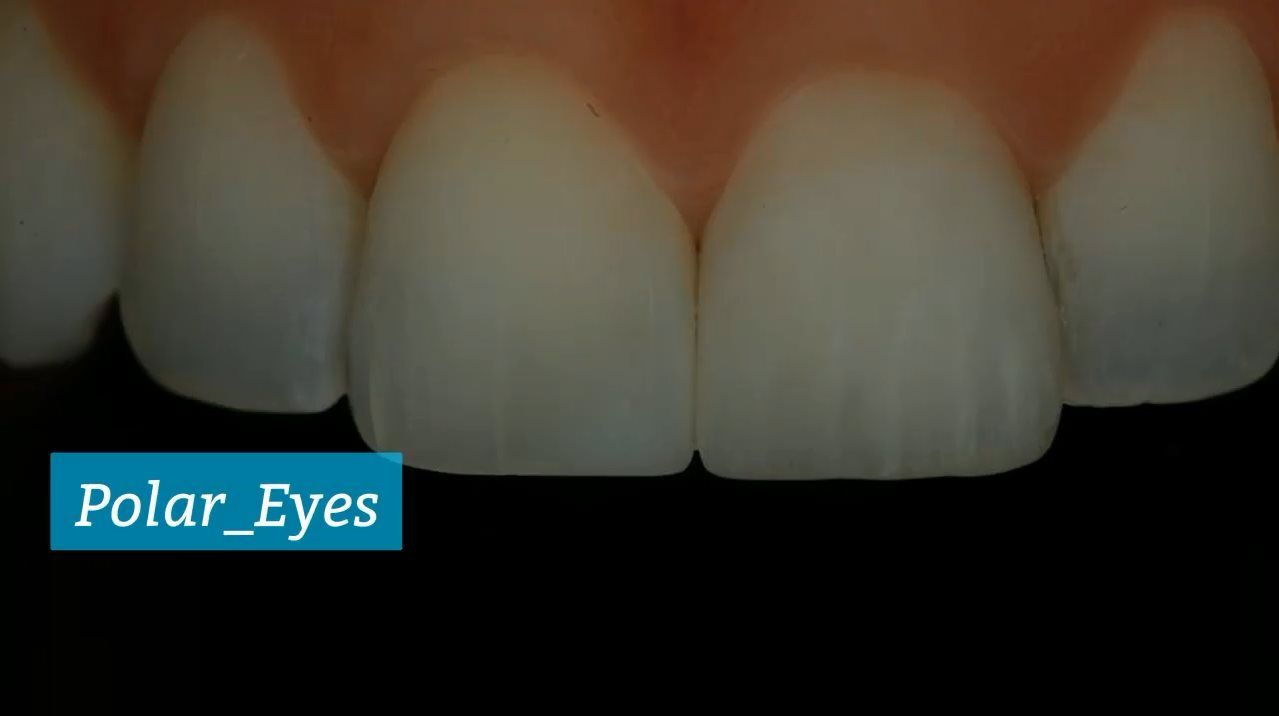
So then, understanding the limitations of porcelain in no-prep, or minimal prep cases, it should be clear that the best material that we have in our armamentarium for minimally invasive dentistry is direct composite, not porcelain. With direct resin, most often there is no tooth preparation at all! Simply clean the tooth (pumice or air abrasion), place and light cure your adhesive, and off you go. We get to use the natural undercuts from tooth contour to our advantage. But, unfortunately, I have found through my 25 years of teaching dentists and dental students, one of the biggest challenges for restorative dentists is placing naturally looking composite restorations. When is this especially challenging you may ask? When we are trying to blend our composite with porcelain restorations.
A common issue that I find in cosmetic dentistry is when I am replacing an old defective crown or restoring a single anterior tooth that has a large defective restoration, there is commonly a tooth proportion issue going on. So often, if I do some minimal bonding on other teeth in the esthetic zone, the single crown or veneer will become more seamless into the smile. This can be a simple mesial diastema closure on a lateral incisor (typically without tooth preparation at all) so that I can create symmetry with the central incisors, rather than extending the distal of the central crown to close the space entirely. Another perfect opportunity to use composite to blend with porcelain is when restoring peg lateral incisors. If you use porcelain to restore peg laterals, you will often note that the canines are unusually narrow, or they are very pointy with exaggerated incisal embrasures. Typically, the ceramist will overextend the distal-mesial dimension of the porcelain restoration to close the spaces, creating a wide, fat looking lateral incisor. Instead, I use composite, again without preparing the tooth, to add contour and tooth form to the canines, so the lateral incisors can have natural shape and form, creating a beautiful and balanced overall smile.
Ok, so we’ve talked about a couple of situations that are ideal for ‘no-preparation’ composite restorations. But how do we time the treatment? Do we do the bonding first, then take an impression for the porcelain restoration? Or do we place the porcelain restoration and then do our bonding? There are advantages to either situation – if I place the composite first, it can be helpful for the ceramist to create the properly sized restoration. However, sometimes it is easier for the ceramist to determine the ideal size restoration (i.e., single central incisor matching the other central incisor). So, if I think it would be easier for the ceramist to create the ideal tooth form and size, I will have them fabricate the porcelain restoration first. The downside of having the porcelain created first, is that it may be a little more challenging for us to create ideal contour and contact with the composite restoration.
Ok, so we’ve talked about a couple of situations that are ideal for ‘no-preparation’ composite restorations. But how do we time the treatment? Do we do the bonding first, then take an impression for the porcelain restoration? Or do we place the porcelain restoration and then do our bonding? There are advantages to either situation – if I place the composite first, it can be helpful for the ceramist to create the properly sized restoration. However, sometimes it is easier for the ceramist to determine the ideal size restoration (i.e., single central incisor matching the other central incisor). So, if I think it would be easier for the ceramist to create the ideal tooth form and size, I will have them fabricate the porcelain restoration first. The downside of having the porcelain created first, is that it may be a little more challenging for us to create ideal contour and contact with the composite restoration.
Related course: Digital Dental Photography
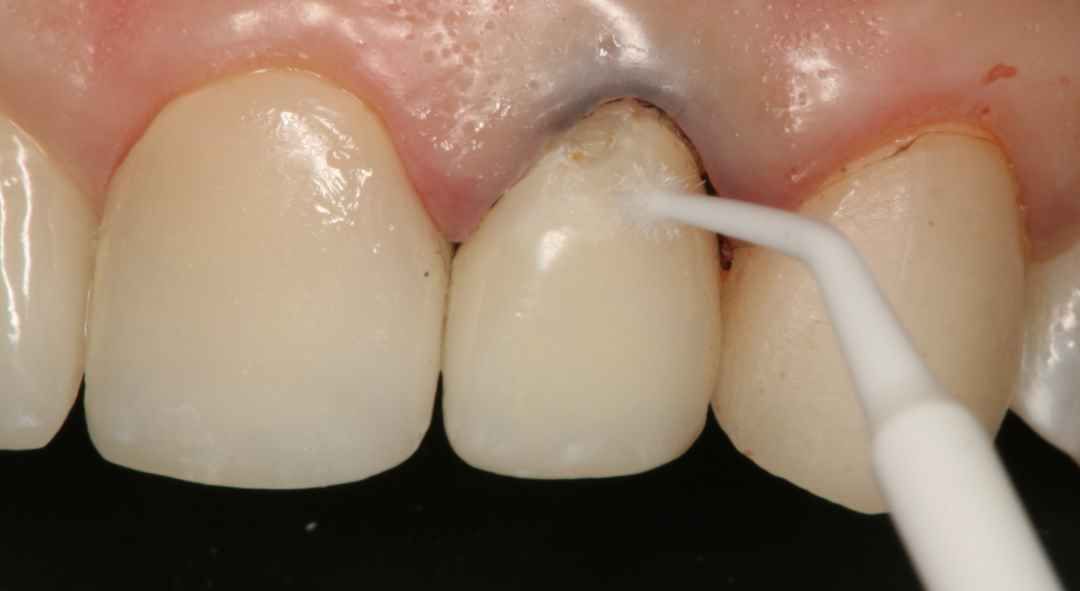
When it comes to matching the porcelain restoration, there are a few things that I look at:
1. Value, or brightness of the porcelain
2. The amount of incisal translucency built into the porcelain
3. The surface texture of the porcelain
Read also: Porcelain Margin Repair
Those are the 3 big issues for me: value, incisal translucency, and surface texture. The layering of composites that I use then are dependent on the aesthetics that I am trying to match. Well actually, I don’t tell patients that we are going to match the bonding to the porcelain – I tell them that I am going to ‘blend’ the composite with the porcelain. This helps to keep the patient’s expectations in check. Utilizing composites, opaquers and tints in proper layers are critical to create variation in translucency for natural esthetics.
The final issue though that is critical to help your composite bonding material blend with your porcelain restoration is choosing the appropriate composite. If you are looking to have the same polish of your composite as the porcelain that you are matching, especially long term, then you must use a microfill composite as the final surface material. Microfill composites polish better than hybrids and nanofills, and they maintain their polish long term. My favorite microfill is from Cosmedent – it’s in their Renamel system.
The final issue though that is critical to help your composite bonding material blend with your porcelain restoration is choosing the appropriate composite. If you are looking to have the same polish of your composite as the porcelain that you are matching, especially long term, then you must use a microfill composite as the final surface material. Microfill composites polish better than hybrids and nanofills, and they maintain their polish long term. My favorite microfill is from Cosmedent – it’s in their Renamel system.
Yours for better dental health,
The final issue though that is critical to help your composite bonding material blend with your porcelain restoration is choosing the appropriate composite. If you are looking to have the same polish of your composite as the porcelain that you are matching, especially long term, then you must use a microfill composite as the final surface material. Microfill composites polish better than hybrids and nanofills, and they maintain their polish long term. My favorite microfill is from Cosmedent – it’s in their Renamel system.
The final issue though that is critical to help your composite bonding material blend with your porcelain restoration is choosing the appropriate composite. If you are looking to have the same polish of your composite as the porcelain that you are matching, especially long term, then you must use a microfill composite as the final surface material. Microfill composites polish better than hybrids and nanofills, and they maintain their polish long term. My favorite microfill is from Cosmedent – it’s in their Renamel system.
Yours for better dental health,
Dennis Hartlieb, DDS, AAACD
DOT Founder
Join 3,000+ dentists who get monthly restorative dentistry tips
Share this page
Latest from our blog

Our vision is to provide online continuing education workshops and mentorship that are comprehensive for dentists learning at all career levels. DOT is developed for dentists that love to learn online.
CONNECT
Materials Included
Light Brown tints, Enamelize, Unfilled Resin Flexidiscs, Flexibuffs 1/2", #1 artist’s brush, Silicone Polishing Points, IPC Off Angle Short Titanium Coated Composite Instrument
Materials Needed, not Included
- Loupes
Follow along
You are Registered
We’re excited to have you join us! You’ll receive email reminders at with the link to join this event.
If you have any questions in the meantime, feel free to reach out to us at dot@dothandson.com—we’re here to help!
Day 1 (8 - 4 pm CST)
-
Erosion and wear – the why and the how
-
Adding length to teeth – when is it safe
-
Opening VDO to compensate for lost tooth structure – where to begin
-
Records visit and key points you need to understand before you start
-
The smile – the 7 strategic points to consider when evaluating the smile
-
Anterior tooth shape, morphology
-
Clinical case review
-
Upper Putty matrix construction
-
Build lingual incisal wall with putty matrix #6 - #11/ Upper anteriors
-
Full contour build-up #6, #7, #8, #9, #10, #11, shape and polish/ Upper anteriors
Day 2 (8 - 2 pm CST)
-
Who – which patients are candidates
-
Why – explaining to patients the value of the prototype
-
How – step-by-step techniques to maximize predictability, efficiency and success
-
Getting to Yes: conversations with patients about esthetic and reconstructive dentistry
-
The ‘Smile Preview’ – techniques to show the possibilities
-
Lower Putty matrix construction
-
Build lingual incisal wall with putty matrix #22 - #27 / lower anteriors
-
Build-up #22 - #27, shape and polish / lower anteriors
-
Build-up lower occlusal posteriors
-
Demonstration of Smile Preview
Upcoming Virtual Workshops
Write your awesome label here.
December 11 & 12, 2025
CPR for the Worn Dentition (16 CE)
Write your awesome label here.
January 29-30, 2026
Porcelain Veneer Cementation Workshop (14 CE)
Write your awesome label here.
March 27, 2026
Esthetic and Functional Success for Diastema Closure (8 CE)
Write your awesome label here.
May 15, 2026
From Break to Beautiful: Flawless Class IV Resin Restorations (8 CE)
Write your awesome label here.
June 19, 2026
Mastering Intraoral Scanners and Digital Workflow for the Dental Team (4 CE)
Write your awesome label here.
September 25, 2026
Veneering the Dark Central Incisor - Conservative Direct and Indirect Restorative Strategies (8 CE)
Write your awesome label here.
October 30, 2026
3D Printing for the Restorative Dentist
Write your awesome label here.
December 11, 2026
Injection Molding Workshop (8 CE)
Write your awesome label here.
Study Club
Join five in-depth virtual meetings held on Thursday evenings throughout the year. Engage in detailed case presentations, discuss curated research articles, and exchange valuable tips with fellow dentists.
-
01/22/2026
-
04/09/2026
-
06/11/2026
-
10/15/2026
-
12/10/2026
Write your awesome label here.
Coffee & Donuts
Kickstart your Friday mornings with informal sessions and discuss patient treatments, practice management, and receive feedback on your cases.
-
01/16/2026
-
02/13/2026
-
03/20/2026
-
04/10/2026
-
05/08/2026
-
06/05/2026
-
08/21/2026
-
10/09/2026
-
11/20/2026
-
12/10/2026
Popular On-Demand Courses
Write your awesome label here.
Injection Moulding Techniques (3 CE)
Simple, predictable, systematic foundation for you to start your journey with injection moulding
Write your awesome label here.
Advanced Techniques in Composite Veneers (6 CE)
Take control of aesthetic cases in your practice, whether you are enhancing smiles with direct resin veneers or creating provisional restorations for indirect cases.
Write your awesome label here.
A Realistic Perspective on Occlusal Appliances (3 CE)
Learn how to design, fabricate, and manage occlusal appliances with confidence through practical guidance and real clinical case examples.
Write your awesome label here.
Bicuspid Veneer and V-Onlay Preparation (3 CE)
Gain expertise in ‘prep-less’ veneers, buccal cusp reduction, and margin placement methods to enhance your clinical outcomes.
Write your awesome label here.
Class IV Composite Restoration – Polychromatic Approach (3 CE)
This on-demand course covers material selection and advanced layering techniques to help you create natural-looking, long-lasting restorations that set you apart.
Write your awesome label here.
EXOCAD: Foundation (2 CE)
Gain the skills to confidently navigate Exocad, build patient cases, and streamline your workflow using time-saving techniques and presets.
Write your awesome label here.
Class II Direct Resin (3 CE)
Master a reliable approach to Class II restorations by learning how to create ideal proximal contacts that enhance both the strength and aesthetics of your work.