our patient calls the office on Monday morning and tells your receptionist that her crown fell off her front tooth. You know the truth before she walks in the door – the post and core that was in the tooth, is still inside the crown that is inside the ziplock bag, that is inside your patient’s purse! Your dental team thinks that this is going to be a quick recement, but you’re already worried that there isn’t going to be enough tooth structure to even recement the post/core/crown temporarily! Sure enough, there is hardly any tooth structure above the gum line, and what is there, is decayed ;(. If you haven’t had an anterior crown that you placed on a patient fall off yet, it’s probably only a matter of time. Losing a front crown is one of the most sensitive issues for our patients…and when it is dentistry that we’ve placed, the patients can be particularly unhappy.
What do we know about treating anterior teeth with crowns?
Two prosthetic considerations will give us the highest chance for success with the definitive restorations. The first is ‘ferule.’ Ferule is the amount of tooth structure that the crown can grab. The ferule is the facial, palatal, and interproximal tooth structure that is available with our preparation. We all know that the more natural tooth structure that we have, the better off we are for long term cementation of our crowns. OK – here’s the important part - even with our wonderful adhesive dental cements, we must have 2 mm of tooth structure to bond our restorations. Less than 2 mm of tooth structure, the crown cementation will become less secure and stable.
The second consideration besides ferule, is the total tooth structure to secure our crown. Now adhesive dentistry has helped us significantly with this issue; however, we still need 4-5 mm of tooth structure, or tooth structure + build-up, to have ideal retention of our bonded crown. This then leads us to the discussion of post and cores for the endodontically treated tooth. When do we need to place a post on endodontically treated teeth.
Dentistry has changed in our understanding and approach to placing posts in endodontically treated teeth. Through research, we have come to understand that posts, especially if the canal system is over instrumented and the canal space is artificially enlarged to support a post, this can lead to fracture of the root down the road. In fact, many dentists have shied away from placing posts because of this concern, but the reality is that there are still indications for placing posts. In my practice, I place posts when I am concerned about the ability of the core build-up to maintain bonded to the tooth structure. Posts do not strengthen roots; posts help us secure, or anchor, the core build-up restoration to reduce the risk of build-up material separation from the tooth structure. But please remember - posts do not strengthen roots!
The technique for placing posts is not particularly complicated, but there are several important factors to consider.
First, we were taught in dental school that the post needs to extend down the root system leaving about 3 mm of apical gutta percha. This technique was related to the cements that we had available at the time, but now that we have the opportunity to chemically bond the posts, perhaps we can reduce the length of the post so that the terminal end of the post is in a thicker area of the root system. With the end of the post in thicker root structure, the risk of root fracture in the future is reduced.
The second issue to consider with the posts is the type of post that we use. There are several options currently for direct posts – metal posts, fiber posts, and fiber reinforced zirconia posts. I definitely do not want to use a metal post when restoring an anterior tooth. Even with our ability to opaque the post and core with our composites, we will need to use a more opaque crown material to block out the low value of the tooth that is common with metal posts. So, I absolutely know that it will be easier for my ceramist to create an esthetic crown if I use a tooth-colored post with a tooth-colored build-up material.
That leaves the choice between an all-fiber post or a zirconia/fiber post. How do you choose? Research suggests that stiff posts, bonded into the root, gives us the most stability in our direct post systems. The flexibility of the all-fiber posts can lead to future breakdown of the adhesive interface. So, given the choice, I am going to choose an esthetic, stiff post, like the DentaPost from Brassler.
The third and final critical issue to consider is how are you going to cement the post. The best, most predictable, and turns out the most simplified technique that I have found is to use my core build-up material as the post cement. My technique is as follows:
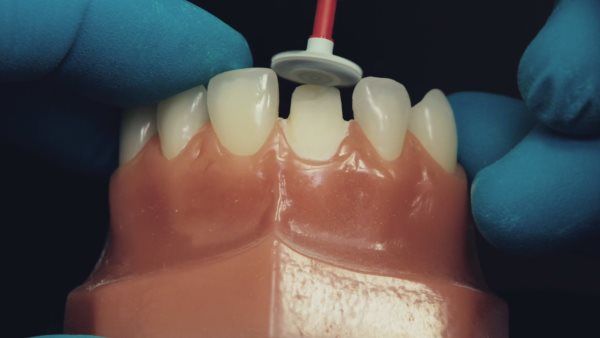
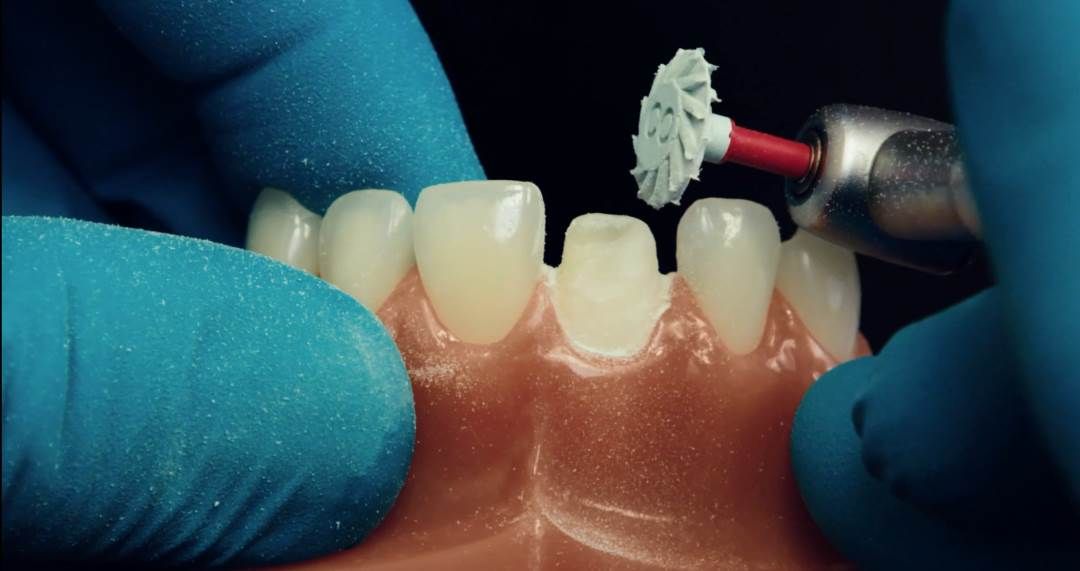
1. Create post space – I like to have about 5 mm of post into the root canal system. This would typically give me a 10 mm post – 5 mm into the canal system, 2 mm of tooth structure (ferule) and 3 mm extension of the post beyond the ferule
2. Etch the canal system and tooth structure with 37% phosphoric acid for 15 seconds, using a microbrush to lightly ‘scrub’ the etchant (alternatively, you can use a self-cure self etch adhesive system)
3. Rinse and make sure all phosphoric acid is removed
4. Remove excess water so that the dentin is left moist, but no pools of water
5. This is critical – you must use a self-cure adhesive – if you use a light cured adhesive, the effect of the light down into the canal system is going to be limited (I use Cosmedent Complete with the self-cure activator), air thin and use microbrushes to remove excess adhesive
6. Inject tooth colored core build-up material into canal system (I use Cosmecore A2 with the metal Centrix syringe tip), place post into the canal, and continue to use the Cosmecore build-up material around the post and onto the tooth structure.
7. Light cure for a full minute. Now your tooth is ready for the final preparation!
To get a fuller explanation of ferule and all issues related to placing the direct esthetic post and core, check out mycourse on dental online training. I hope that this review is helpful and I look forward to sharing more techniques with you down the road!
Yours for better dental health,
Dennis Hartlieb, DDS, AAACD
DOT Founder
Join 3,000+ dentists who get monthly restorative dentistry tips
Brasseler: Fine Modified Flat-End Diamond Bur, ET9 FG Needle Fine 8 Blade Red Carbide Bur, 7408 OS1 FG Football Carbide Bur, Fine Needle Mosquito Diamond Bur, Medium Depth Cutting Diamond Bur, Feather Lite Polishers,Polishing Cups
Cosmedent: Universal Composite Renamel NANO Plus (A1), Renamel Microhybrid MWO, Ranamel Microfill A1, Renamel Hybrid flowable A1, Light Incisal, A1 Opaquer, White Opaquer,
Light Brown tints, Enamelize, Unfilled Resin Flexidiscs, Flexibuffs 1/2", #1 artist’s brush, Silicone Polishing Points, IPC Off Angle Short Titanium Coated Composite Instrument
Materials Needed, not Included
Loupes
High Speed
Slow Speed
Curing Light
Alcohol Gauze
Boley Gauge
Floss
Teflon tape
Mylar strips
Follow along
You are Registered
We’re excited to have you join us! You’ll receive email reminders at with the link to join this event.
If you have any questions in the meantime, feel free to reach out to us at dot@dothandson.com—we’re here to help!
Day 1 (8 - 4 pm CST)
Erosion and wear – the why and the how
Adding length to teeth – when is it safe
Opening VDO to compensate for lost tooth structure – where to begin
Records visit and key points you need to understand before you start
The smile – the 7 strategic points to consider when evaluating the smile
Build-up #22 - #27, shape and polish / lower anteriors
Build-up lower occlusal posteriors
Demonstration of Smile Preview
Purchase Your Kit & Endo Motor
Hands-On Kit
Click the link below to purchase your hands-on kit. It will be sent to you two weeks before the live event.
Endo Motor
Email luna@dothandson.com to request a loaner endo motor (needs to be returned) or to purchase outright.
Upcoming Virtual Workshops
Write your awesome label here.
December 11 & 12, 2025
CPR for the Worn Dentition (16 CE)
Write your awesome label here.
January 29-30, 2026
Porcelain Veneer Cementation Workshop (14 CE)
Write your awesome label here.
March 27, 2026
Esthetic and Functional Success for Diastema Closure (8 CE)
Write your awesome label here.
May 15, 2026
From Break to Beautiful: Flawless Class IV Resin Restorations (8 CE)
Write your awesome label here.
June 19, 2026
Mastering Intraoral Scanners and Digital Workflow for the Dental Team (4 CE)
Write your awesome label here.
September 25, 2026
Veneering the Dark Central Incisor - Conservative Direct and Indirect Restorative Strategies (8 CE)
Write your awesome label here.
October 30, 2026
3D Printing for the Restorative Dentist
Write your awesome label here.
December 11, 2026
Injection Molding Workshop (8 CE)
Write your awesome label here.
Study Club
Join five in-depth virtual meetings held on Thursday evenings throughout the year. Engage in detailed case presentations, discuss curated research articles, and exchange valuable tips with fellow dentists.
01/22/2026
04/09/2026
06/11/2026
10/15/2026
12/10/2026
Write your awesome label here.
Coffee & Donuts
Kickstart your Friday mornings with informal sessions and discuss patient treatments, practice management, and receive feedback on your cases.
01/16/2026
02/13/2026
03/20/2026
04/10/2026
05/08/2026
06/05/2026
08/21/2026
10/09/2026
11/20/2026
12/10/2026
Popular On-Demand Courses
Write your awesome label here.
Injection Moulding Techniques (3 CE)
Simple, predictable, systematic foundation for you to start your journey with injection moulding
Write your awesome label here.
Advanced Techniques in Composite Veneers (6 CE)
Take control of aesthetic cases in your practice, whether you are enhancing smiles with direct resin veneers or creating provisional restorations for indirect cases.
Write your awesome label here.
A Realistic Perspective on Occlusal Appliances (3 CE)
Learn how to design, fabricate, and manage occlusal appliances with confidence through practical guidance and real clinical case examples.
Write your awesome label here.
Bicuspid Veneer and V-Onlay Preparation (3 CE)
Gain expertise in ‘prep-less’ veneers, buccal cusp reduction, and margin placement methods to enhance your clinical outcomes.
Write your awesome label here.
Class IV Composite Restoration – Polychromatic Approach (3 CE)
This on-demand course covers material selection and advanced layering techniques to help you create natural-looking, long-lasting restorations that set you apart.
Write your awesome label here.
EXOCAD: Foundation (2 CE)
Gain the skills to confidently navigate Exocad, build patient cases, and streamline your workflow using time-saving techniques and presets.
Write your awesome label here.
Class II Direct Resin (3 CE)
Master a reliable approach to Class II restorations by learning how to create ideal proximal contacts that enhance both the strength and aesthetics of your work.
Sign in here or create a new account for free.Sign in here create a new account for free.