
Dr. Dennis Hartlieb
Posterior indirect photographic documentation

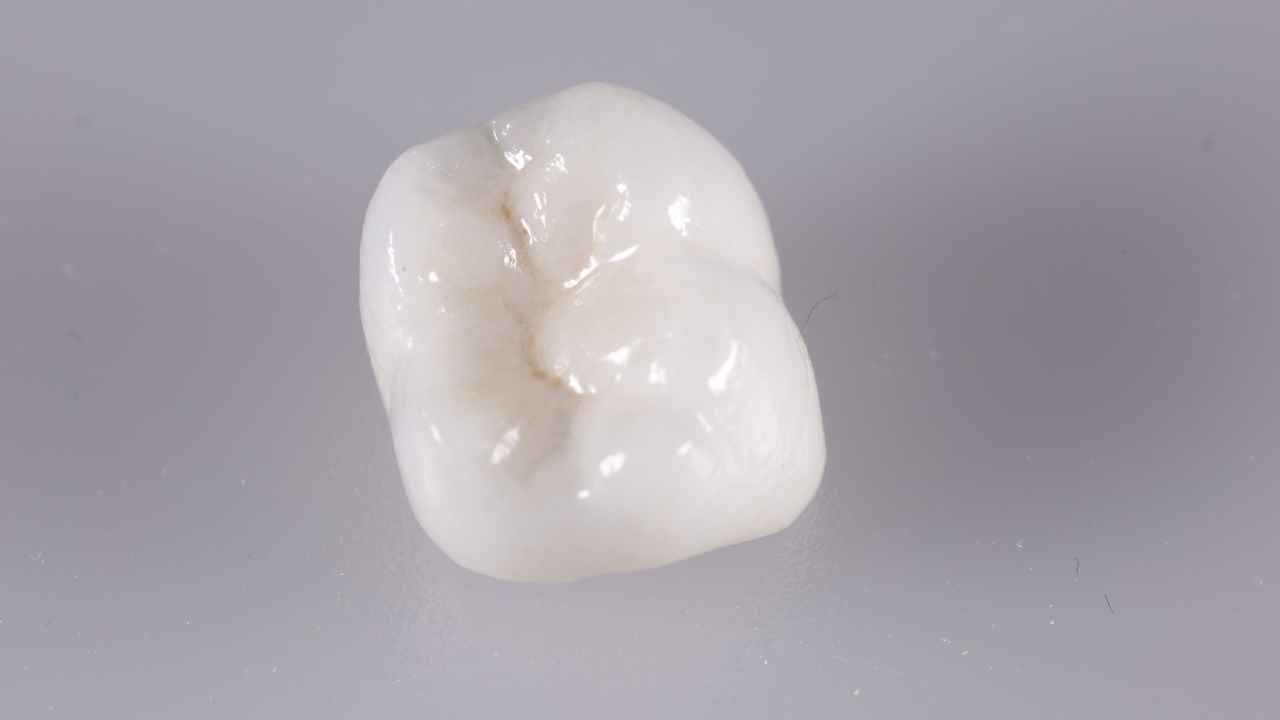
From Ugly to Life-like Restorations
Esthetics in dentistry comes in many forms. Porcelain veneers, composite bonding, porcelain crowns, teeth whitening, orthodontics: all of these are powerful tools to use when treating esthetic cases for our dental patients. However, it seems like the emphasis for esthetic dental restorations is generally related to the patients’ front teeth.
What about the premolars and molars? I feel strongly that, whenever possible, esthetic dentistry should be provided regardless of the tooth position in the patient’s mouth – front tooth, side tooth, back tooth. My opinion is based on two points: 1) the materials available today allow us, in most circumstances, to create naturally appearing restorations, and 2) my experience that patients judge us on dentistry on back teeth, before they trust us to do dentistry on their front teeth. As crazy as it might sound, I have had several patients that come to me from their general dentist to do cosmetic dentistry, because, as they framed it, “if the dentist couldn’t make my back teeth look nice, how can I trust them to make the front teeth look good?”. It might be as simple as an occlusal composite or a ceramic crown, but many patients will judge us on dentistry outside of what we normally think of as the ‘esthetic zone’ – our basic and routine restorative dentistry.
Many years ago I was frustrated that the crowns that I was receiving back from my lab lacked natural characterization and did not blend with the patient’s natural teeth. I was speaking with Don Cornell, a master ceramist from Newport Beach, California, about my disappointment with these posterior crowns. Don asked me a very simple and profound question that I still think about today – he asked, “Are you taking pictures of the patient’s neighboring teeth and sending them to my lab technician to use when building the crowns?” It absolutely never occurred to me to use photographs to help my ceramist fabricate crowns for teeth other than the patient’s anterior teeth. After that conversation with Don, I immediately began taking photographs of the neighboring teeth even when restoring a lower molar with an indirect restoration. What a difference it made!
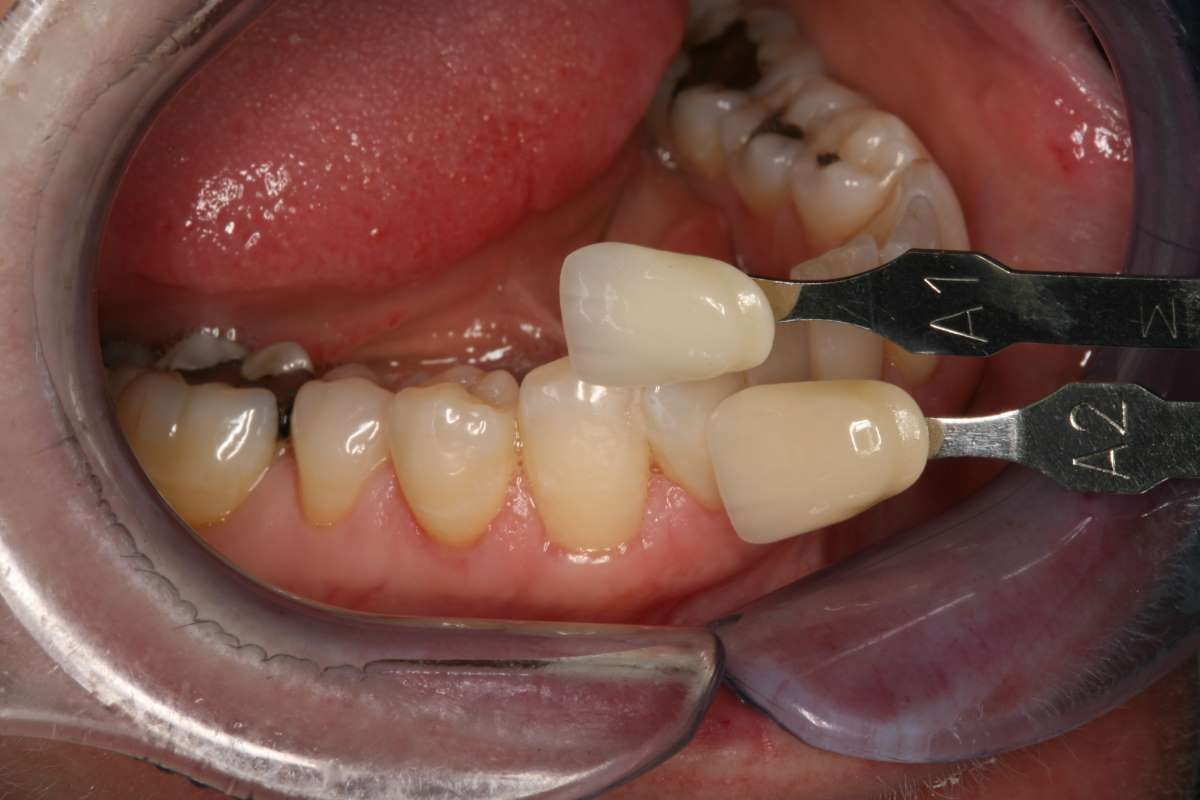
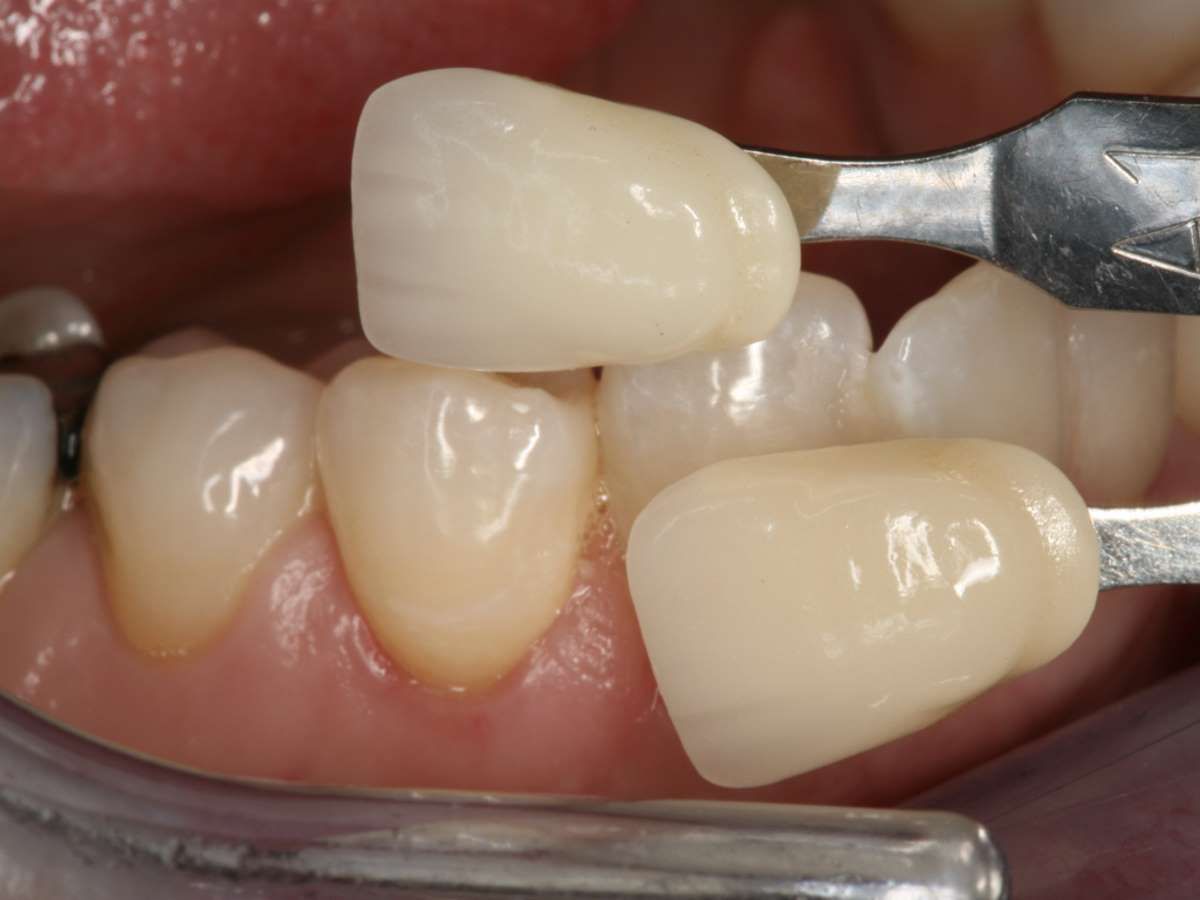
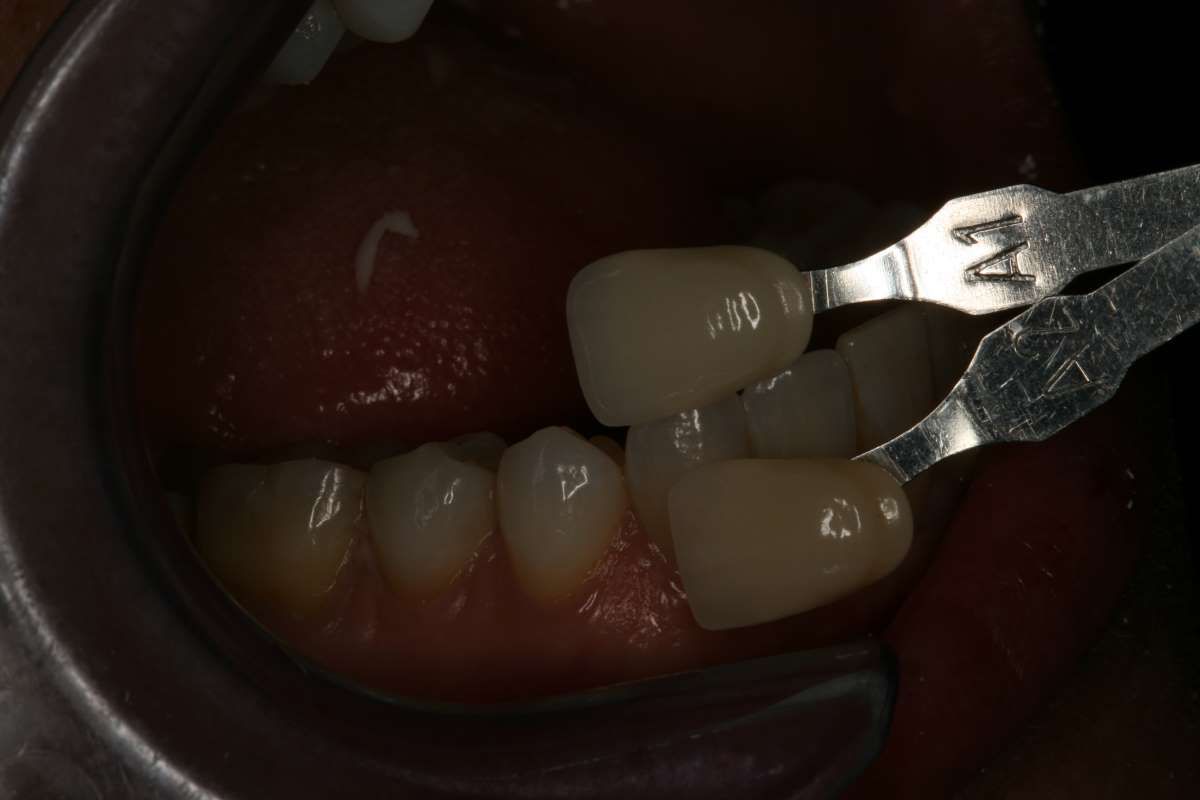
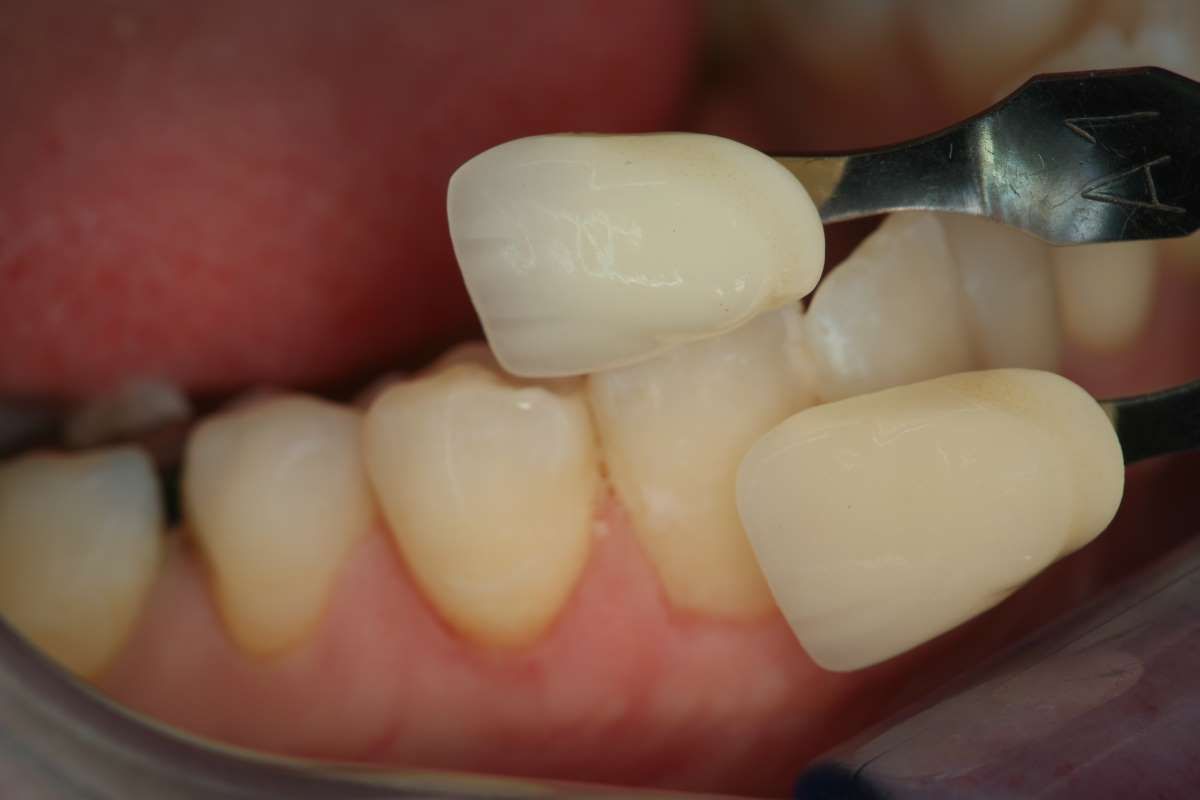
The problem that we experience is that the shade of the teeth does not exactly match the color (hue, chroma, value) of the shade guide tab(s) that we are using to communicate shade to our technicians. So when we tell our technicians that the tooth is Vita Shade A1, and the technician fabricates a crown that looks like Shade A1, it rarely blends in with the natural dentition. This is because, as we all know, teeth are highly complex when considering translucency, colorization, and surface effects. Photographs of the shade guide adjacent to the teeth that we are documenting give the technicians valuable information that will allow them to enhance the ceramic restoration to better blend with the natural teeth. When I take a photograph of teeth using, for instance in this case, the Vita shade A1 and A2, the ceramist can note that the value of the teeth are a little lower than the shade tabs in the photograph, and probably need a little more chroma.
Technicians will also appreciate the increase in chroma, how far into the body of the tooth the chroma intensifies. Subtleties, like craze lines, facets, stains, and surface texture can be added to the restorations to create as life-like restoration as possible. Using a polarizing filter will also give the ceramist valuable information related to the value, or brightness, of the tooth to be restored. The polarizing filter works by eliminating the reflection from the light and flash to help gain a true appreciation of the chroma and brightness of the teeth in the photograph, relative to the accompanying shade tab(s).
The following are my recommendations when photographing posterior teeth for indirect restorations:
1. Use a 35 mm digital SLR camera with a 100 macro lens. I use a Canon 5-D, but there are many cameras available for dental applications.
What about the premolars and molars? I feel strongly that, whenever possible, esthetic dentistry should be provided regardless of the tooth position in the patient’s mouth – front tooth, side tooth, back tooth. My opinion is based on two points: 1) the materials available today allow us, in most circumstances, to create naturally appearing restorations, and 2) my experience that patients judge us on dentistry on back teeth, before they trust us to do dentistry on their front teeth. As crazy as it might sound, I have had several patients that come to me from their general dentist to do cosmetic dentistry, because, as they framed it, “if the dentist couldn’t make my back teeth look nice, how can I trust them to make the front teeth look good?”. It might be as simple as an occlusal composite or a ceramic crown, but many patients will judge us on dentistry outside of what we normally think of as the ‘esthetic zone’ – our basic and routine restorative dentistry.
Many years ago I was frustrated that the crowns that I was receiving back from my lab lacked natural characterization and did not blend with the patient’s natural teeth. I was speaking with Don Cornell, a master ceramist from Newport Beach, California, about my disappointment with these posterior crowns. Don asked me a very simple and profound question that I still think about today – he asked, “Are you taking pictures of the patient’s neighboring teeth and sending them to my lab technician to use when building the crowns?” It absolutely never occurred to me to use photographs to help my ceramist fabricate crowns for teeth other than the patient’s anterior teeth. After that conversation with Don, I immediately began taking photographs of the neighboring teeth even when restoring a lower molar with an indirect restoration. What a difference it made!
The problem that we experience is that the shade of the teeth does not exactly match the color (hue, chroma, value) of the shade guide tab(s) that we are using to communicate shade to our technicians. So when we tell our technicians that the tooth is Vita Shade A1, and the technician fabricates a crown that looks like Shade A1, it rarely blends in with the natural dentition. This is because, as we all know, teeth are highly complex when considering translucency, colorization, and surface effects. Photographs of the shade guide adjacent to the teeth that we are documenting give the technicians valuable information that will allow them to enhance the ceramic restoration to better blend with the natural teeth. When I take a photograph of teeth using, for instance in this case, the Vita shade A1 and A2, the ceramist can note that the value of the teeth are a little lower than the shade tabs in the photograph, and probably need a little more chroma.
Technicians will also appreciate the increase in chroma, how far into the body of the tooth the chroma intensifies. Subtleties, like craze lines, facets, stains, and surface texture can be added to the restorations to create as life-like restoration as possible. Using a polarizing filter will also give the ceramist valuable information related to the value, or brightness, of the tooth to be restored. The polarizing filter works by eliminating the reflection from the light and flash to help gain a true appreciation of the chroma and brightness of the teeth in the photograph, relative to the accompanying shade tab(s).
The following are my recommendations when photographing posterior teeth for indirect restorations:
1. Use a 35 mm digital SLR camera with a 100 macro lens. I use a Canon 5-D, but there are many cameras available for dental applications.
2. Use a ring flash or a point flash system that is close to the lens. When I use a 2-point extended arm flash system, I tend to get a lot of shadows, and it is more difficult to obtain quality photographs.
3. The photographs should be shot at a relatively small aperture opening (f-stop 25-32). This will help prevent lack of detail (blurriness) due to poor depth-of-field if the f-stop is opened.
4. Take photographs prior to preparation of the tooth/teeth. e will typically take the photographs while the patient is getting numb.
5. Keep the teeth moistened. We use a lightly water saturated cotton roll and dab the teeth to keep them moist.
6. Use retractors to pull the patient’s lips and cheeks back. Dental mirrors and fingers to retract do not work nearly as well.
7. Take photographs of the teeth, close up from the buccal and from the occlusal. If we are using the bicuspids as a guide (when treating the molars), we do not often need to use buccal mirrors. However, there are times when I need to photograph the first molar when restoring the second molars. In these cases, I’ll generally use a buccal mirror, but using shade tabs, with the mirror, is really difficult.
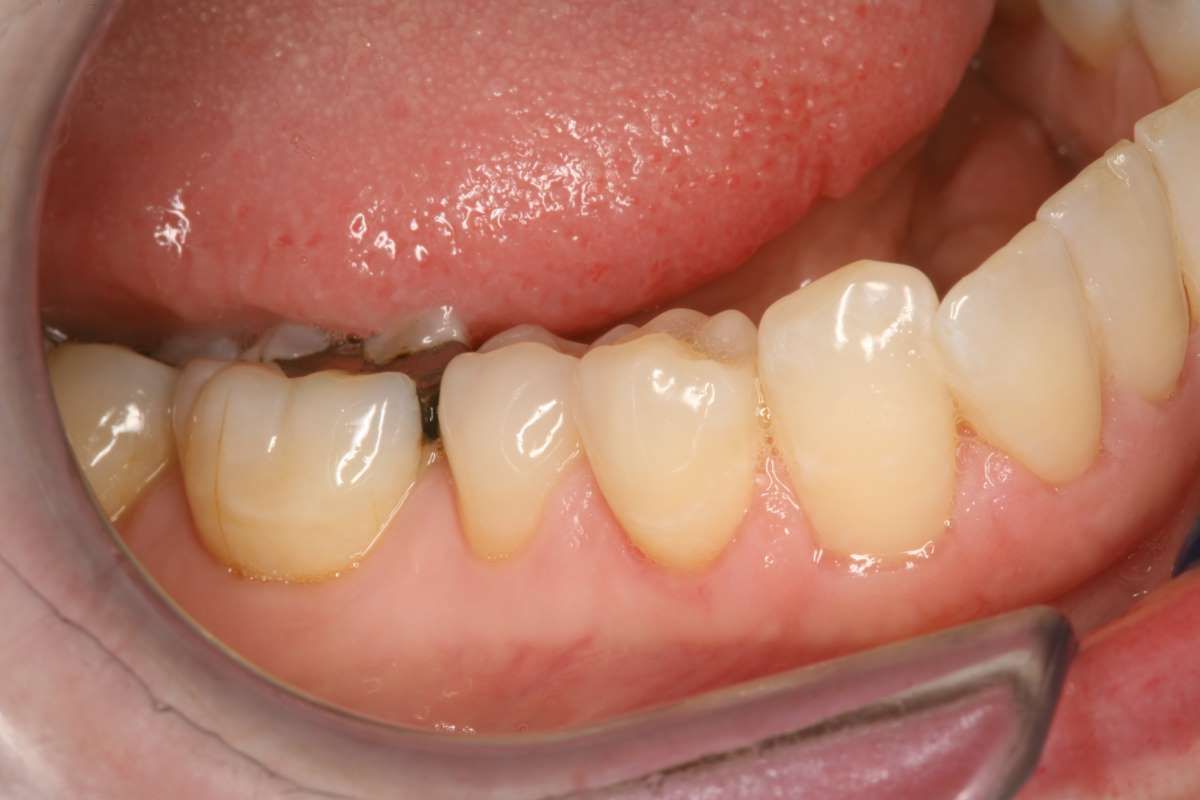
8. We take multiple photographs with different combinations of shade tabs. Typically we will have one shade tab at the incisal/cusp tips of the bicuspids, and a more chromatic shade tab at the gingival
9. Make sure that the shade tab number is visible. Don’t zoom in too closely that you only see the shade tab, but you aren’t able to see which shade it is. Also, make sure that the person holding the shade tab does not have their finger or thumb covering the shade number.
10. Very often if the shade tab angle is parallel to the camera lens, the light from the flash will reflect or bounce off of the metal holder of the shade tab. This causes too much light to hit the sensor. The result is that the image will be black or too dark to be useful for the lab technician. So very often, the camera or the shade tabs need to be re-angled so that the light reflection does not cause the over illumination of the sensor. Be prepared to change the angle of the camera or have your assistant reposition the shade tabs.
11. Use a polarizing filter (I use the Polar-Eyes) with the same shade tabs. This will help your technician when evaluating the value of the restoration. You will either need to increase the light output from your flash, or open the f-stop to allow more light into the sensor with the filter over the lens.
12. Following preparation of the tooth, we’ll take both occlusal and buccal photographs using retractors (typically metal retractors) and buccal mirrors. These images are critical for the ceramist to see the underlying color of the tooth to understand the opacity of the porcelain necessary to either allow the natural tooth color to shine through or to block darkness that would affect the overall value of the ceramic restoration.
Related course: Digital Dental Photography
13. The images are transferred from the memory card to our computers. Finally, the images are transferred to the lab technician for use when they fabricate the onlay or the crown.
These photographs are typically done by my dental assistants, but it is important that the dentist is also an expert in these photography techniques. In my 20 years of dental education experience, if dentists are not comfortable taking photographs, it is impossible for them to train their team members to take excellent photographs. If you think that your team is not skilled enough to be able to take photographs, think about how difficult it is to take intraoral x-rays. I believe if someone is skilled enough to take really good x-rays, they can be trained to take excellent dental photographs.
Yours for better dentistry,
Yours for better dentistry,
Dennis Hartlieb, DDS, AAACD
DOT Founder
Join 3,000+ dentists who get monthly restorative dentistry tips
Share this page
Latest from our blog

Our vision is to provide online continuing education workshops and mentorship that are comprehensive for dentists learning at all career levels. DOT is developed for dentists that love to learn online.
CONNECT
Materials Included
Light Brown tints, Enamelize, Unfilled Resin Flexidiscs, Flexibuffs 1/2", #1 artist’s brush, Silicone Polishing Points, IPC Off Angle Short Titanium Coated Composite Instrument
Materials Needed, not Included
- Loupes
Follow along
You are Registered
We’re excited to have you join us! You’ll receive email reminders at with the link to join this event.
If you have any questions in the meantime, feel free to reach out to us at dot@dothandson.com—we’re here to help!
Day 1 (8 - 4 pm CST)
-
Erosion and wear – the why and the how
-
Adding length to teeth – when is it safe
-
Opening VDO to compensate for lost tooth structure – where to begin
-
Records visit and key points you need to understand before you start
-
The smile – the 7 strategic points to consider when evaluating the smile
-
Anterior tooth shape, morphology
-
Clinical case review
-
Upper Putty matrix construction
-
Build lingual incisal wall with putty matrix #6 - #11/ Upper anteriors
-
Full contour build-up #6, #7, #8, #9, #10, #11, shape and polish/ Upper anteriors
Day 2 (8 - 2 pm CST)
-
Who – which patients are candidates
-
Why – explaining to patients the value of the prototype
-
How – step-by-step techniques to maximize predictability, efficiency and success
-
Getting to Yes: conversations with patients about esthetic and reconstructive dentistry
-
The ‘Smile Preview’ – techniques to show the possibilities
-
Lower Putty matrix construction
-
Build lingual incisal wall with putty matrix #22 - #27 / lower anteriors
-
Build-up #22 - #27, shape and polish / lower anteriors
-
Build-up lower occlusal posteriors
-
Demonstration of Smile Preview
Upcoming Virtual Workshops
Write your awesome label here.
December 11 & 12, 2025
CPR for the Worn Dentition (16 CE)
Write your awesome label here.
January 29-30, 2026
Porcelain Veneer Cementation Workshop (14 CE)
Write your awesome label here.
March 27, 2026
Esthetic and Functional Success for Diastema Closure (8 CE)
Write your awesome label here.
May 15, 2026
From Break to Beautiful: Flawless Class IV Resin Restorations (8 CE)
Write your awesome label here.
June 19, 2026
Mastering Intraoral Scanners and Digital Workflow for the Dental Team (4 CE)
Write your awesome label here.
September 25, 2026
Veneering the Dark Central Incisor - Conservative Direct and Indirect Restorative Strategies (8 CE)
Write your awesome label here.
October 30, 2026
3D Printing for the Restorative Dentist
Write your awesome label here.
December 11, 2026
Injection Molding Workshop (8 CE)
Write your awesome label here.
Study Club
Join five in-depth virtual meetings held on Thursday evenings throughout the year. Engage in detailed case presentations, discuss curated research articles, and exchange valuable tips with fellow dentists.
-
01/22/2026
-
04/09/2026
-
06/11/2026
-
10/15/2026
-
12/10/2026
Write your awesome label here.
Coffee & Donuts
Kickstart your Friday mornings with informal sessions and discuss patient treatments, practice management, and receive feedback on your cases.
-
01/16/2026
-
02/13/2026
-
03/20/2026
-
04/10/2026
-
05/08/2026
-
06/05/2026
-
08/21/2026
-
10/09/2026
-
11/20/2026
-
12/10/2026
Popular On-Demand Courses
Write your awesome label here.
Injection Moulding Techniques (3 CE)
Simple, predictable, systematic foundation for you to start your journey with injection moulding
Write your awesome label here.
Advanced Techniques in Composite Veneers (6 CE)
Take control of aesthetic cases in your practice, whether you are enhancing smiles with direct resin veneers or creating provisional restorations for indirect cases.
Write your awesome label here.
A Realistic Perspective on Occlusal Appliances (3 CE)
Learn how to design, fabricate, and manage occlusal appliances with confidence through practical guidance and real clinical case examples.
Write your awesome label here.
Bicuspid Veneer and V-Onlay Preparation (3 CE)
Gain expertise in ‘prep-less’ veneers, buccal cusp reduction, and margin placement methods to enhance your clinical outcomes.
Write your awesome label here.
Class IV Composite Restoration – Polychromatic Approach (3 CE)
This on-demand course covers material selection and advanced layering techniques to help you create natural-looking, long-lasting restorations that set you apart.
Write your awesome label here.
EXOCAD: Foundation (2 CE)
Gain the skills to confidently navigate Exocad, build patient cases, and streamline your workflow using time-saving techniques and presets.
Write your awesome label here.
Class II Direct Resin (3 CE)
Master a reliable approach to Class II restorations by learning how to create ideal proximal contacts that enhance both the strength and aesthetics of your work.